Table Widget Data Population Examples
About this task
Once you have defined your table, as described in Add a Table Widget, you can use Blockly to add data to the table, either manually by hard-coding values or by connecting to a database through a REST API.
Note: Make a note of the Name you provided for your various Table
widgets. You will need to select these when building your data connection
blocks.
Add Hard-Coded Rows to a Table Manually
About this task
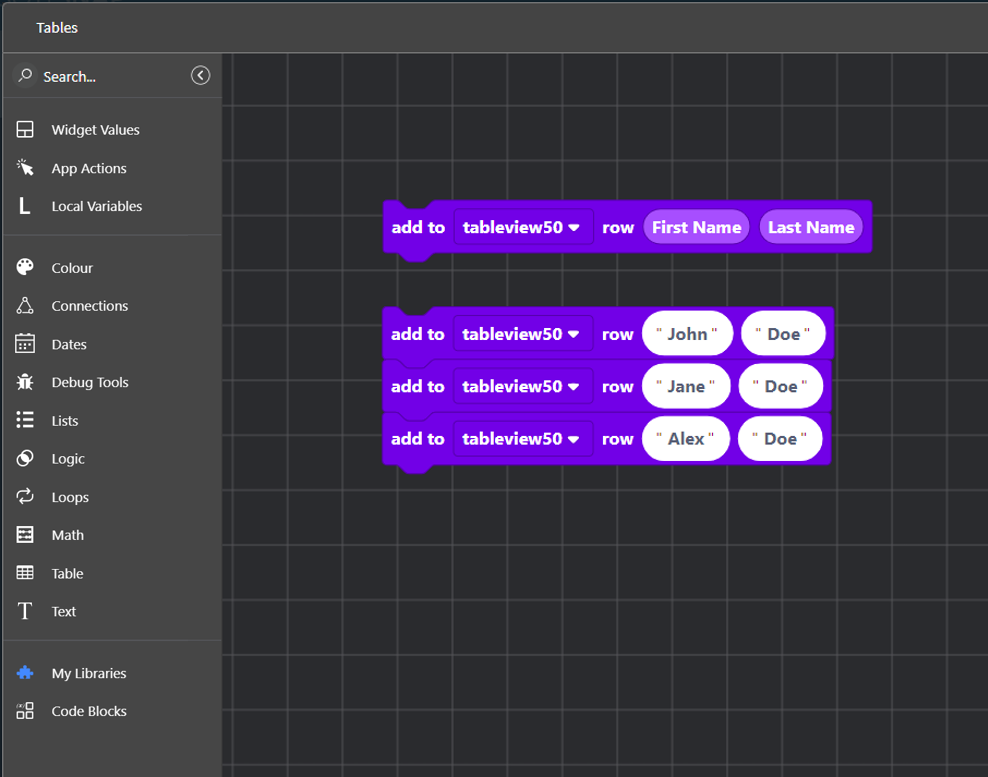
In this example, we have defined a table with two columns: First Name and Last Name. We will hard-code some data rows with the Blockly editor.
Procedure
- In the project canvas's Table Properties tab, click Add in the Data Import section to open the Blockly editor.
- In the Blockly editor's left-hand panel, click Table and drag an Add To block into the main area.
- In the Add To block, click the select dropdown list and choose your table name. In this example, First Name and Last Name appear in the block's row section to represent our column headings.
- In the left-hand panel, click Text and drag a white quote bubble into the main area.
- Type a first name into the bubble. Right-click the bubble and select Duplicate. Type a Last Name into the new bubble.
- Drag the first name and last name bubbles onto the corresponding areas of the Add To block.
- Right-click the Add To block and click Duplicate. Repeat this for as many unique rows as you want to include in your table.
- Type unique First Names and Last Names into the text bubbles on the duplicated Add To blocks.
-
Drag and connect the Add To blocks. Here's an
example of a completed block and an additional row that is not filled in
yet:
- Enter a Blockly file name into the field in the upper left corner of the screen and click Save. You will be returned to the Canvas view, where you can click Preview and see the rows of your table populated with the hard-coded data.
Add Rows to a Table Using a Table Block
Before you begin
You need a database source that is reachable through Blockly when using a REST API.
About this task
In this example, we have defined a table with three columns: ID, First Name, and Last Name. We will populate the table using a Blockly table block.
The following is a video summary of the step-by-step example:
Procedure
- In the Canvas, click the table that will receive the data.
- In the Table Properties panel, go to the Data Import section. Beside Configure Blockly Script, click Add. The Blockly editor will open.
- In the Blockly Name field, enter a name for the Blockly script.
- In the Blockly editor's left-hand panel, click the Table group and drag a load data to table block into the main area.
- Click the load data to table dropdown and select the table name.
-
In the load data to table block's
URL field, enter the address of the database API
(Application Programming Interface) connection, including port and any
parameters (for example
?limit=1000to limit the data rows returned).Note: The REST dropdown is set to GET by default. This setting is necessary to receive data. - Select local request if the table is retrieving data that does not go through a SOTI Snap server.
-
Provide your database credentials by entering your
Username and Password.
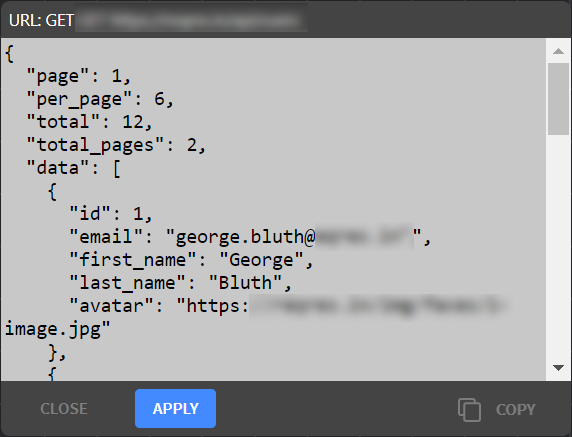
Click Test.
A pop-up window appears with a Response text box that shows connection response data. Review the result. Click Apply to finalize the data source and dismiss the pop-up.Note: Data is exchanged as a JSON array. The image of test results below shows array names, field names, and field values.
-
In the on success block, click
+ in the response data
sub-block and choose the array name containing data for your table fields.
In the example video above, the array name is
data.
Note: The names of all arrays and sub-arrays in the data source will be listed in the dropdown of the response data sub-block.
- Below the response data sub-block are the names of the table columns. For each column name, click the dropdown beside it, and select the data source field name of the column. Click Save. You will return to the Canvas.
-
Select Save in the SOTI Snap
banner to apply your changes.

-
In the Canvas, click the
preview button to run the app. The
Preview Options window will open.

- Click Preview to accept the default skin. The app will open, and you may verify that the data has populated your table.