Data Export to a Custom PDF: Export Using a Selected Connection
Before you begin
About this task
Keep the forms that work for you. With SOTI Snap, you can build apps that export data to your company's current PDF forms. Whether you are moving an activity solely to an app or want to keep the option to fill out a form manually, there is no need to change your documents. SOTI Snap works with your methods to present information your way.
Data connection rules decides where SOTI Snap sends your exports, what data maps to your PDF, and how SOTI Snap filters export records.
- Gmail Connection
- Google Drive Connection
- Microsoft OneDrive Connection
- Microsoft SharePoint Connection
- Email Connection
- FTP/SFTP Connection
To export data to a custom PDF using one of (Gmail/Google Drive/Microsoft OneDrive/Microsoft SharePoint/SMTP email/{FTP or SFTP}) connection, you must:
Step 1: Set Up the Connection
About this task
Procedure
- Select the Apps tab. The App Manager opens, showing available apps.
- Select the app name. The editor opens.
- Select the Data Connection Rules tab.
- Under Data Export Rule, select New Data Export Rule. The Create Data Export window opens.
- Under Name, enter a descriptive name for the rule.
-
For the selected connection, proceed with the following steps:
Connection Procedure Gmail To create a Gmail connection:
- Select Gmail. Select Next twice.
- Select an existing Google account or add a new one.
- To add a new Google account, select
Create New.
- In Connection Name, enter a name for the connection. Do not use an email address.
- Select Sign in with Google. A Google account sign-in browser window opens.
- Follow Google's sign-in prompts to verify the email account to use with SOTI Snap.
- Select Next. The Create Data Export — Gmail window opens.
- Select a form within your app and fill in the
Email Template Settings fields.
- To: Enter at least one email address. Use macros to dynamically populate the recipients field based on the app's contents.
- Subject: Enter a subject line for the email message. Use macros and metadata to dynamically populate the subject line from the app's contents.
- Message: Enter text for the body of the email message. Use macros and metadata to populate the subject line from the app's contents dynamically.
- Select Test Connection to verify that you can send an email under this configuration. Once confirmed, select Next.
Google Drive To create a Google Drive connection:
- Select Google Drive. Select Next twice.
- Select an existing Google account or add a new one.
- Optional: To add a new Google account,
select Create New.
- In Connection Name, enter a name for the connection. Do not use an email address.
- Select Sign in with Google. A Google account sign-in browser window opens.
- Follow Google's sign-in prompts to verify the email account you are using with SOTI Snap.
- Select Next.
Microsoft OneDrive To create a Microsoft OneDrive connection:
- Select OneDrive. Select Next twice.
- Select an existing Microsoft OneDrive account or add a new one.
- Optional: To add a new Microsoft OneDrive account, select
Create New.
- In Microsoft account name, enter an account name for the connection.
- Select Authenticate. A Microsoft account sign-in browser window opens.
- Follow Microsoft's sign-in prompts to verify the account you are using with SOTI Snap.
Microsoft SharePoint To create a Microsoft SharePoint connection:
- Select SharePoint. Select Next twice.
- Select an existing Microsoft SharePoint account or add a new one.
- Optional: To add a new SharePoint
connection, select Create
New.
- In Microsoft account name, enter a name for the connection. Do not use an email address.
- Select Authenticate. A Microsoft account sign-in browser window opens.
- Follow Microsoft's sign-in prompts to verify the account you are using with SOTI Snap.
- Select Next.
Email To create an email connection:
- Select Email. Select Next twice.
- Select an existing SMTP account or add a new one.
- Optional: To add a new SMTP account,
select Create New.
- Complete the following connection details:
- SMTP account name
- Hostname
- Port number
- Username
- Password
- Sender email
- Sender name
- Select Test Connection. Once confirmed, select Next. The Create Data Export — Email window opens.
- Complete the following connection details:
- Select a form within your app and fill in the
Email Template Settings
fields.
- To: Enter at least one email address. Use macros to dynamically populate the recipients field based on the app's contents.
- Subject: Enter a subject line for the email message. Use macros and metadata to dynamically populate the subject line from the app's contents.
- Message: Enter text for the body of the email message. Use macros and metadata to populate the subject line from the app's contents dynamically.
FTP/SFTP To create an FTP/SFTP connection:
- Select FTP/SFTP. Select Next twice.
- Select an existing FTP/SFTP connection or add a new one.
- Optional: To add a new FTP/SFTP
connection, select Create
New.
- Complete the following connection details:
- Connection Name
- FTP/SFTP Server Address
- Port#
- Username
- Password
- Select Test Connection. Once confirmed, select Next.
- Complete the following connection details:
- Select Browse File.
- Navigate to and select your custom .pdf form.
- Select Next.
Step 2: Map App Fields to Your PDF
Map App Fields to Your PDF
Before you begin
About this task
To map app fields to your custom PDF.
Procedure
- Optional:
Set field format defaults.
Note: Text boxes, check boxes, and radio buttons have default formats for fonts and sizes. You may change these settings later. Changes do not affect fields already placed on the PDF form. SOTI recommends that you set the defaults first.
-
Select the
 Set default styles button. The Set
Default Styles window opens.
Set default styles button. The Set
Default Styles window opens.
- Update the Default Field Settings as required to set properties such as font, size, and color.
-
Select the
-
Go to the Unmapped tab to find available fields, not on
the form. If the field you need is absent, go to the
Mapped tab.
Note: After you use a field in the PDF form, they appear in the Mapped tab. For fields used more than once, the number of uses appears in brackets beside the field name.
- From the left toolbar, drag the desired field to your PDF. Place it in the space where the data goes. Use the handles on the perimeter of the field to resize it.
- Optional:
Change individual Field Settings as
required.
Note: This is not the same as changing default settings. These changes only affect the current field.
- Repeat steps 2 to 4 for each field you place on the form.
- Optional:
Select the
 Preview exported PDF button to download a draft version
of the PDF. Inspect the PDF to assess if you require changes.
Note: If you review your exported PDF and decide the PDF template is not correct, you may replace your PDF template by selecting the
Preview exported PDF button to download a draft version
of the PDF. Inspect the PDF to assess if you require changes.
Note: If you review your exported PDF and decide the PDF template is not correct, you may replace your PDF template by selecting the Replace PDF button.
 - Select Next.
Step 3: Select the Export Details
Procedure
-
For the selected connection, proceed with the following step(s):
Connection Procedure - Gmail
- FTP/SFTP
Use a filter to select only the necessary records to export:
In the Create Data Export window, select the File Name field. Enter the name for the exported PDF file. You can use macros to dynamically generate a more specific file name based on the record's contents. Choose a macro from the macro list (select
 ) to add data such as form field values or
metadata.
) to add data such as form field values or
metadata. - Google Drive
- Microsoft OneDrive
- Microsoft SharePoint
To complete the export configuration, select the Google Drive/Microsoft OneDrive/Microsoft Sharepoint destination and filter the data to export.
- In the Create Data Export - Google Drive/OneDrive/Sharepoint window, select Select Google Drive/OneDrive/Sharepoint Site and folder. Navigate to the destination folder for your .pdf exports.
- Select the File Name
field. Enter the name for the exported PDF file
when saved to your Google Drive/Microsoft
OneDrive/Microsoft Sharepoint folder. You can use
macros to dynamically generate a more specific
file name based on the record's contents. Choose a
macro from the macro list (select ) to add form field values or metadata
such as Created by device name to the file
name.
- Select Next.
-
Choose which data from the app to export to this destination.
- Every new record to export all new app data.
- Filter records to export only a subset of the app's data.
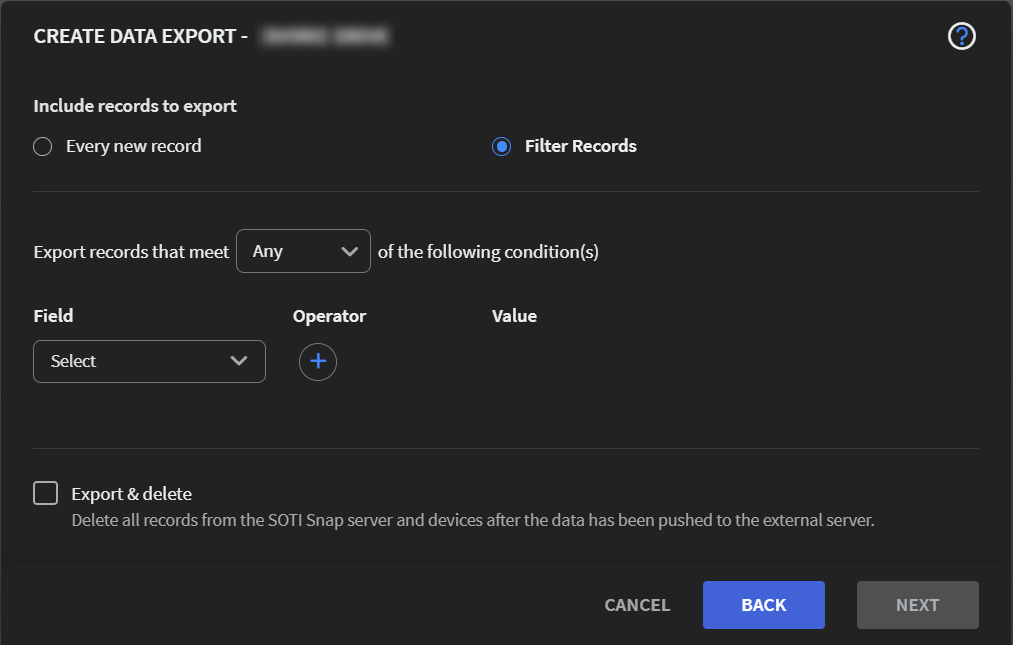
-
If you select Filter records, do the following:
- Specify if the record must meet all or any of the defined export conditions.
- Select the field where you want to apply the condition. Use the Operator and Value fields to set your conditions.
- Select Add to add more conditions.
- Optional: Select Export & delete to delete the records chosen by the filter after the export operation is complete. Records are then removed from the SOTI Snap server and devices with local copies.
- Once satisfied with all your conditions, select Next.
- Review the data connection settings for accuracy. Select Finish to save your data connection or Back to return to an earlier screen and make edits.