Inbound Email
About this task
Note: To send and receive emails through Office 365 integration, you need
to configure, and obtain information from Microsoft Exchange Server (see Configuring Microsoft Exchange Server).
Procedure
- Login to the SOTI XSight web console as administrator.
- From the main menu, select
- Toggle Enable inbound emails.
-
In the Inbox dropdown menu, select
Add New Email.
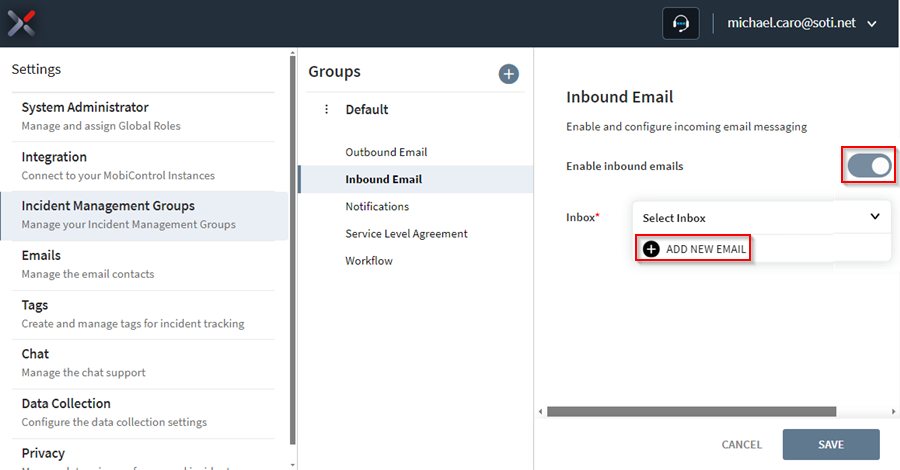 Note: All currently configured inbound email contacts are available in the Inbox dropdown menu.
 -
Configure the inbound email settings in the Add Inbound Email panel.
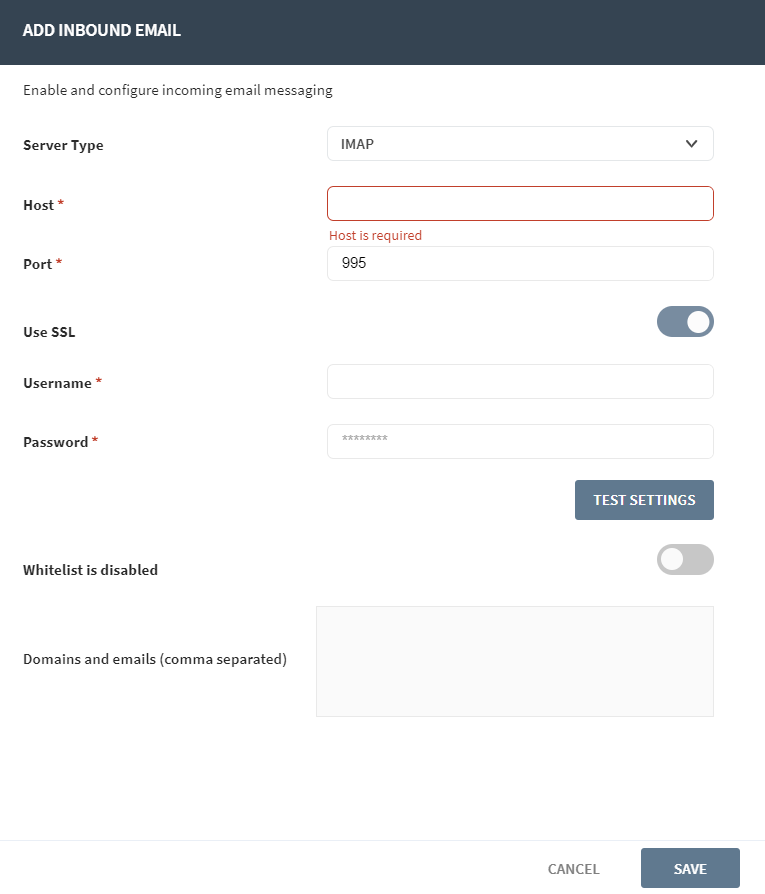 Note: Use the following table to configure the inbound email settings.
Server Type Select the inbound email server type from the drop-down list: "POP3," "IMAP," or "Office 365." Most fields in this section change depending on the server type you have selected. Host Appears for "POP3" and "IMAP." Enter the hostname of the inbound email server that receives emails. Port Appears for "POP3" and "IMAP." Enter the port used by the inbound email server to receive emails. Use SSL Appears for "POP3" and "IMAP." Enable if the inbound email server used to receive emails uses secure communication. Username Appears for "POP3" and "IMAP." Enter the username to authenticate on the inbound email server. Password Appears for "POP3" and "IMAP." Enter the password to authenticate on the inbound email server. Email Appears for "Office 365." Enter the email address for receiving incoming emails (for example, mobilesupport@<yourcompanyname>.com). Client ID Appears for "Office 365." Enter the Client ID value you have obtained when registering with Microsoft. Tenant ID Appears for "Office 365." Enter your Microsoft Tenant ID. Client Secret String Appears for "Office 365." Paste the Client Secret value you obtained when registering with Microsoft. Polling Frequency Appears for "Office 365." The default email polling period is 2 minutes. Optionally, change the frequency by entering a different number of minutes. Test Settings After saving changes, select this button to test receipt of an inbound email using the current configuration. Errors (if any) display on the screen. Whitelist is Enabled/Disabled Toggle on to enable whitelisting of specific domains and/or email addresses. Domains and Emails (Comma Separated) If you have enabled whitelisting, enter a comma-separated list of email addresses and domains from which to accept inbound emails. Important: Leaving this field empty blocks all inbound emails. - Select Test Settings to test receipt of an inbound email using the current configuration. Any errors display on screen.
- Select Save.