Enrolling Windows Modern Devices using Autopilot and Azure Join
Before you begin
Ensure you have configured Azure Active Directory as directed in Enrolling Windows Modern Devices with Azure Active Directory Join. Consult the following lists to ensure you meet Windows support and licensing requirements:
The following Microsoft Windows 10 editions are supported for Windows Autopilot:
- Windows 10 Pro
- Windows 10 Pro Education
- Windows 10 Pro for Workstations
- Windows 10 Enterprise
- Windows 10 Education
- Windows 10 Enterprise 2019 LTSC
For Windows Autopilot, one of the following subscriptions is required:
- Microsoft 365 Business Premium subscription
- Microsoft 365 F3 subscription
- Microsoft 365 Academic A1, A3, or A5 subscription
- Microsoft 365 Enterprise E3 or E5 subscription, which includes all Windows 10, Microsoft 365, and EM+S features (Azure AD and Intune)
- Enterprise Mobility + Security E3 or E5 subscription, which includes all needed Azure AD and Intune features
- Intune for Education subscription, which includes all needed Azure AD and Intune features
- Azure Active Directory Premium P1 or P2 and Microsoft Intune subscription (or an alternative MDM service)
Check the Microsoft 365 Enterprise Licensing Resource for more information.
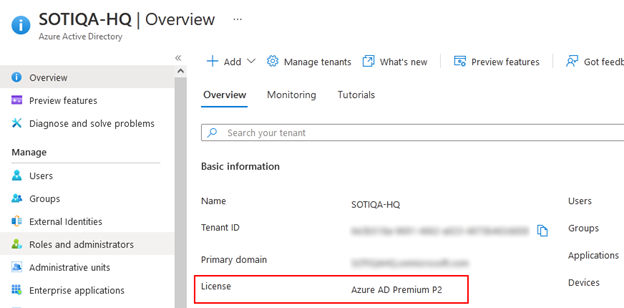
Azure Active Directory subscription:
Autopilot requires an Azure Active Directory (AAD) premium subscription. You can check your subscription status by navigating to:
About this task
This procedure details the steps to enroll Windows Modern devices into on-premises SOTI MobiControl using Windows Autopilot. You can read more about Autopilot here: Overview of Windows Autopilot.
Capture the Hardware ID and Reset the Out-of-Box Experience on the Windows Device
Procedure
-
On the device to be enrolled, open an elevated PowerShell terminal and run
the following commands in order:
Note: This is only applicable for devices that have not been configured by the OEM or reseller.
md c:\HWID Set-Location c:\HWID Set-ExecutionPolicy -Scope Process -ExecutionPolicy Unrestricted -Force Install-Script -Name Get-WindowsAutopilotInfo -Force $env:Path += ";C:\Program Files\WindowsPowerShell\Scripts" Get-WindowsAutopilotInfo.ps1 -OutputFile AutopilotHWID.csv -
When you are prompted to install the NuGet package, select [Y]
Yes.
When this installation finishes, a .csv file titled AutopilotHWID.csv appears on the C:\ drive.
- Copy the .csv file to a removeable storage device for later use when you set up Autopilot registration.
- Reset the Windows 10 device back to the default out-of-box-experience. You can learn more here: How to refresh, reset, or restore your PC.
Configure Company Branding and Bypass Intune Auto-Enrollment in Azure AD
Procedure
- Sign into Azure AD as an Administrator and select .
- Assign a custom background, company logo, and custom messages here as needed then click Save to apply your changes.
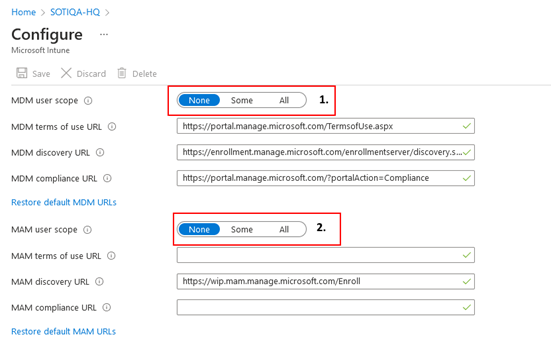
-
Select . Ensure that MDM user scope and
MAM user scope are both set to
None.
Configure Registration, Device Group, and Autopilot Deployment Profile in Microsoft Endpoint Manager
Procedure
- Log into Microsoft Endpoint Manager as an Administrator and set up Autopilot registration.
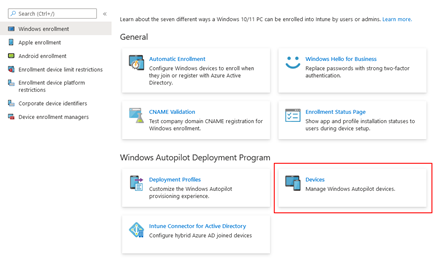
-
Select .
- Click Import.
- Upload the AutopilotHWID.csv file that you copied to removeable storage from the Windows device.
-
Click Import to add the data to Endpoint.
Note: The process will take some time to complete (up to 15 minutes).
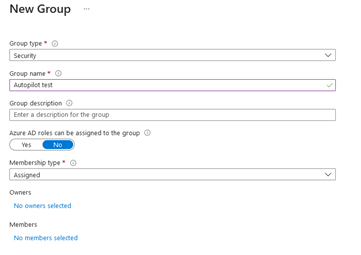
- Create a device group for Windows Autopilot. Select .
- Set the Group type to Security and enter a Group name.
- Set Azure AD roles can be assigned to the group to No.
-
Set Membership type to
Assigned.
- Click the No members selected link to add your users to the group.
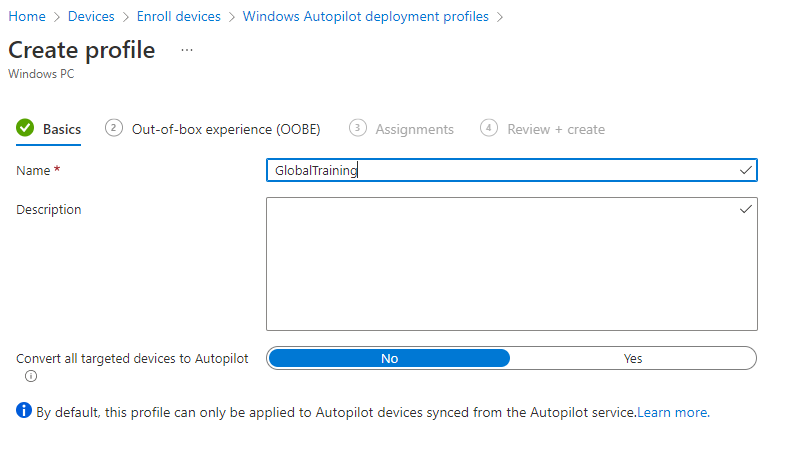
- Create the Windows Autopilot Deployment Profile. Select
-
Name the profile and set Convert all targeted devices to
Autopilot to No and click
Next.
-
In the out-of-box experience (OOBE) section, set the following
options:
- Deployment mode - User-Driven
- Join to Azure AD as - Azure AD joined
- Microsoft Software License Terms – Hide
- Privacy Settings – Hide
- Hide change account options – Hide
- User Account type – Standard
- Allow pre-provisioned deployment – No
- Language (Region) – Operating System default
- Automatically Configure keyboard – Yes
- Language (Region) – Operating System default
- Click Next to proceed to the assignments.
- Select the Autopilot group you created in step 6.
- Click Next to proceed to the Review and create tab.
- Click Create to create the Deployment Profile.
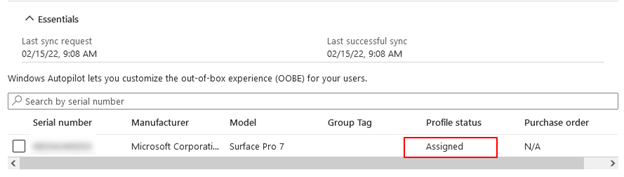
-
While still in Endpoint, navigate to and make sure the Profile status is
appears as Assigned.
Launch Windows Autopilot Setup Process
About this task
At this point, you can return to the Windows device you reset to default out-of-box-experience, turn it on and complete the setup.
Procedure
- Proceed through the out-of-box experience starting with the region and keyboard selection screens, then on to the branded login based on the configurations you made earlier.
- Enter the user Email address and click Next.
- Enter the user Password and click Next.
- After some time, you should be presented with the Terms and Conditions that were set in the SOTI MobiControl Windows Modern Add Devices Rule as described in Enrolling Windows Modern Devices with Azure Active Directory Join.
- Accept the terms and conditions.
-
Let the out-of-box-experience complete and follow the steps to sign in and
set up Windows Hello.
The device should be enrolled into SOTI MobiControl.