Creating Windows OS Image
Before you begin
About this task
This task describes how to create a Windows OS image configuration in SOTI MobiControl.
Note: When creating an OS image, a compatibility check verifies
the agent version. Devices running agent versions earlier than 2025.1 are not
supported.
Note: You can only create a Windows OS image for one device at a
time.
Procedure
- Navigate to .
-
Select your Windows Modern device and choose
Create OS Image from the list of available device
actions. The Create Windows OS Image window appears.
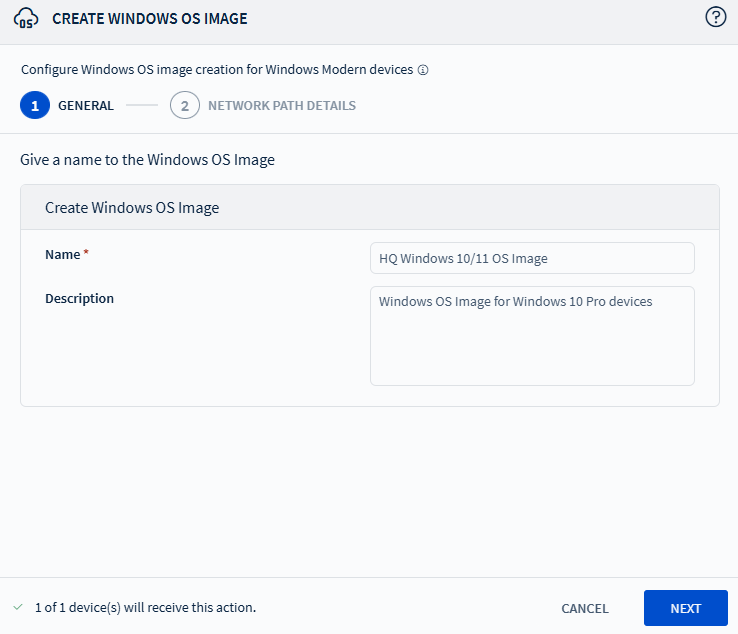
- In the General tab, enter a name and description for the OS image. Select Next.
-
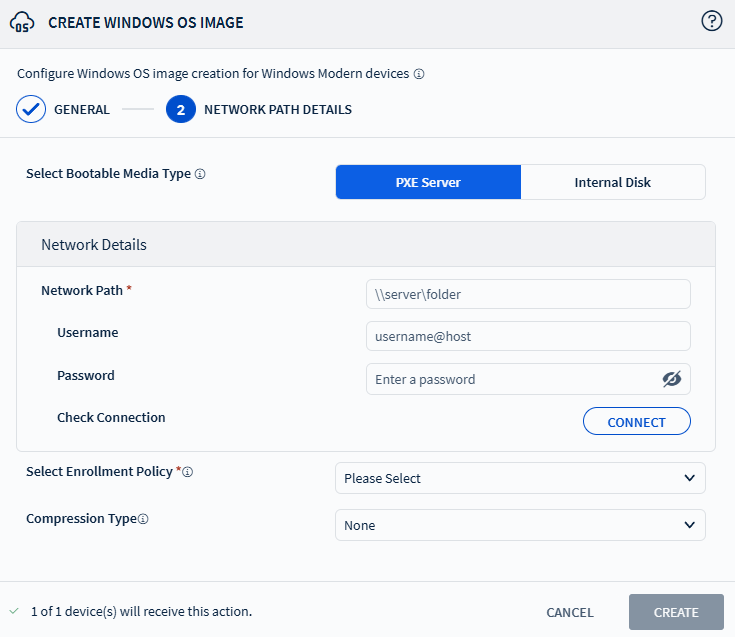
In the Network Path Details tab, select the Bootable Media
Type from:
- PXE Server (see Using PXE Server for more details)
- Internal Disk (see Using Internal Disk for more details)
-
Configure the required network details:
Network Path Enter a valid network path accessible by all the client and server machines. Username Enter a valid username for authentication. Password Enter the password associated for the username. Check Connection Select Connect to verify the connection to the network path. Only after successful authentication can you proceed with the OS image creation process. -
Select your Windows Modern enrollment policy from the list.
Note: The device that you are creating an OS image of unenrolls from SOTI MobiControl during the OS image creation process. This enrollment policy will bring the device back into SOTI MobiControl.
-
Choose a compression type from the list:
- None: No image compression.
- Fast: Quicker image compression with moderate space saving.
- Max: Maximum image compression (may cause some file loss).
- If using the Internal Disk option, enter a valid Bootable Media Path that has WinPE image and the .sdi file.
- Select Create to begin the OS image configuration.
Results
- Once the OS image creation process starts, an intermediate modal opens with details of the creation process.
- Selecting OK docks the modal to the right of the screen.
- The modal dynamically updates every five seconds with the status of the image creation and deployment process.
- Select Clear to remove completed or failed image creation entries from the modal.
Note: For optimum performance, do not leave processes in the modal
for extended periods.
What to do next
Using PXE Server Configuration
Procedure
- Create a Preboot Execution Environment (PXE) server to load Win PE. See Configuring PXE server for more details.
- Set up a Trivial File Transfer Protocol (TFTP) server on the PXE server.
-
Set up a Dynamic Host Configuration Protocol (DHCP) server. See Quickstart: Install and configure DHCP
Server and Configuring DHCP Server for more
details.
Tip: Reserve the IP address of the PXE machine during DHCP setup to prevent dynamic IP changes.
-
Create a WinPE image. See Creating
WinPE Image for more details.
Note: The WinPE image must include the appropriate drivers for each OEM along with unattend.xml file.
- Set up a shared network drive and configure its credentials to enable access and connection for image creation and deployment.
Using Internal Disk Configuration
Procedure
-
Create a WinPE image. See Creating
WinPE Image for more details.
Note: The WinPE image must include the appropriate drivers for each OEM along with unattend.xml and boot.sdi files.
- Set up a shared network drive and configure its credentials to enable access and connection for image creation and deployment.
- In the Bootable Media Path, provide the path to your WinPE image and the .sdi file.