Setting Up HiveMQ for MQTT Device Brokering
Before you begin
- Latest version of the HiveMQ Server
- Installed SOTI Connect
- Message Queuing Telemetry Transport (MQTT) Certificates
- Text editor software (Notepad ++ or similar)
- Keystore creation tool (Portecle or similar)
- Java Runtime Environment (JRE) 8 or later
- Java SE Development Kit (JDK) 11 or later
- Open JDK11 (GA) (Download here)
Note:
- Install HiveMQ on a separate machine for optimal performance.
- MQTT certificates are not included with SOTI Connect. You must manage and renew them manually before expiration.
- Devices must use QoS 1 or QoS 2. Using QoS 0 may result in message loss on the HiveMQ broker.
About this task
Available Editions:
- Professional
- Community
- Enterprise
- Trial
SOTI recommends using the HiveMQ Professional Edition for production environments or the Community Edition for evaluation purposes.
You can configure communication between SOTI Connect, HiveMQ, and OEM devices using one of the following security options:
- Insecure TCP: No encryption or security features.
- Server-side TLS: The client validates the server certificate. For SOTI Connect, the client validates the certificate signed by the Root CA provided when adding the MQTT PA. (This configuration is used in the example below.)
- TLS with Client Certificates: Both server and client validate each other using certificates.
Note: Review your network infrastructure. Load balancers,
firewalls, and NAT devices may close idle TCP connections prematurely. Configure
timeouts appropriately, TCP idle timeout ≥ broker timeout ≥ 1.5 × device ping
interval.
Use the checklist below to verify your setup:
- Is TLS termination handled at HiveMQ or upstream?
- Are idle timeouts configured on all intermediaries?
- Are multiple printers sharing the same public IP address?
For a guided walk-through of HiveMQ configuration, see VIDEO.
Procedure
-
Download and install HiveMQ:
- For manual installation, download the HiveMQ binaries from HiveMQ Community GitHub. Scroll to the Quick Start section of the page and download the binary package.
- To install HiveMQ as a Windows service, download the service installer from HiveMQ Windows Service.
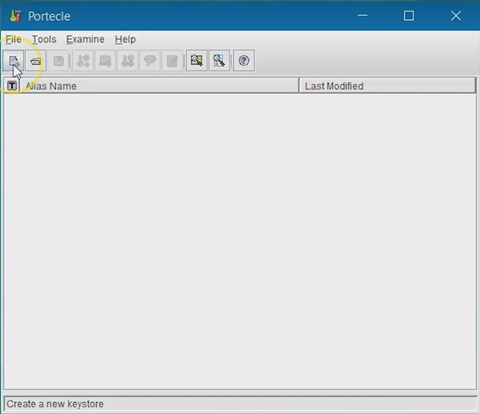
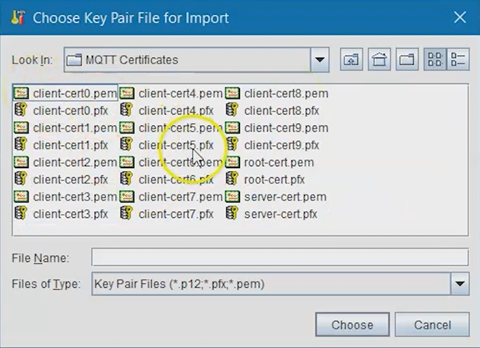
- Navigate to your MQTT Certificates directory.
-
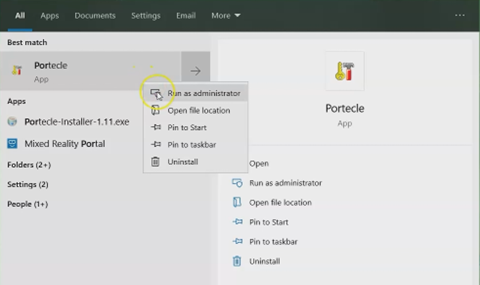
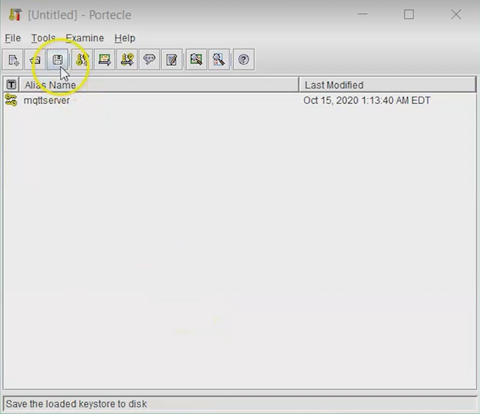
Run Portecle as an administrator.
-
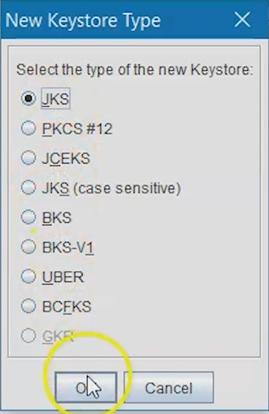
Select New Keystore Type, then choose JKS as the keystore type.
Select OK.
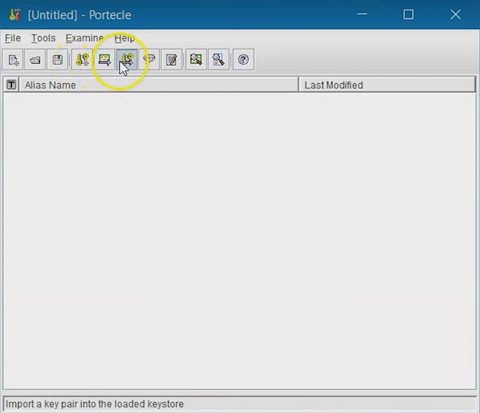
-
Select Import Key Pair, choose your server certificate
(.pfx) file, then select Choose.
-
Enter the MQTT certificate password defined during SOTI Connect installation, then select OK.
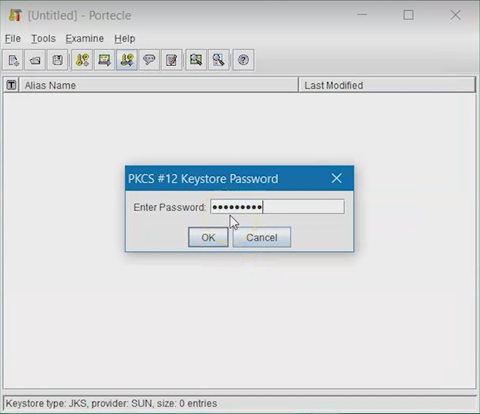
- Confirm the Key Pair password.
-
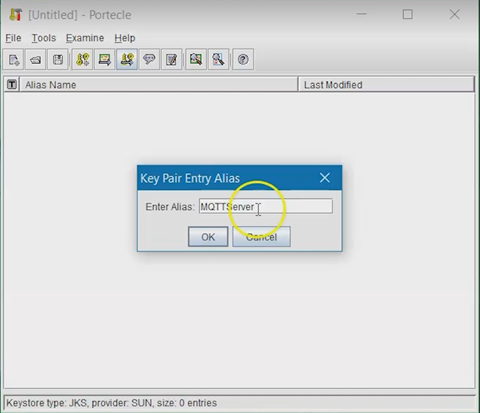
Enter an Alias for the Key Pair, then select OK.
-
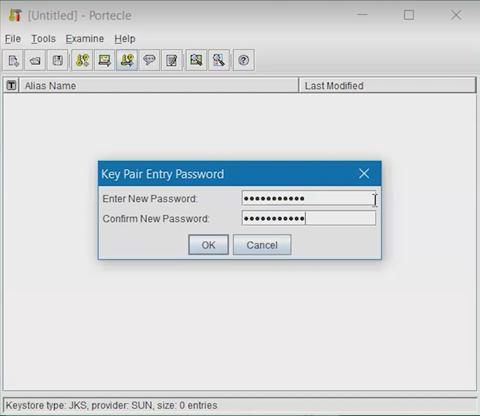
Create a new password for the Key Pair.
-
Select the Key Pair and choose Set Keystore Password, and enter the
password for HiveMQ to use.
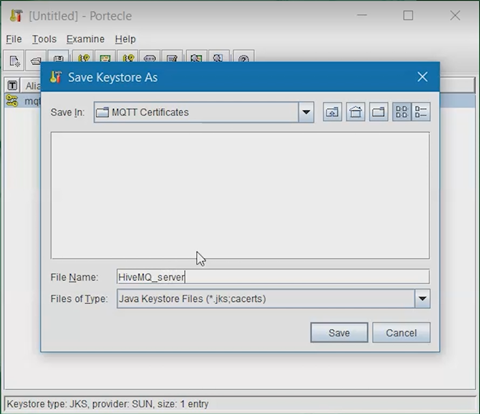
-
Save the Keystore file with your chosen name in the MQTT Certificates
directory.
- Copy the Keystore file and paste it into the appropriate HiveMQ subdirectory (for example, /conf).
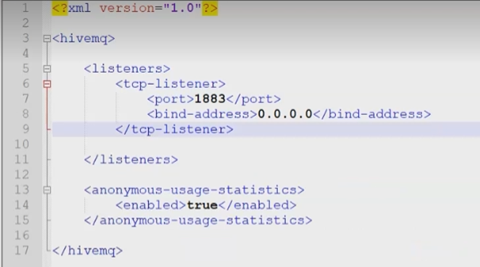
- Open config.xml in the HiveMQ /conf directory using a text editor.
-
Review the default configuration. The file includes an unsecured TCP listener
on port 1883.
-
Add a TLS Listener on port 8883 using the created
Keystore:
<tls-tcp-listener>
	<port>8883</port>
	<bind-address>0.0.0.0</bind-address>
	<tls>
		<keystore>
			<path>.conf/HiveMQ_MQTT.jks</path>
			<password>JKS_Password</password>
			<private-key-password>PrivateKey_Password</private-key-password>
		</keystore>
		<truststore>
			<path>.conf/HiveMQ_MQTT.jks</path>
			<password>JKS_Password</password>
		</truststore>
		<client-authentication-mode>NONE</client-authentication-mode>
	</tls>
</tls-tcp-listener>
-
Add keep-alive and session expiry settings inside the
<mqtt>element:<mqtt> <keep-alive> <allow-unlimited>true</allow-unlimited> <maximum-keep-alive>60</maximum-keep-alive> </keep-alive> <session-expiry> <maximum-interval>3600</maximum-interval> </session-expiry> </mqtt>This defines how long idle clients remain connected and how long their session state is retained after disconnecting.Note:- Set the broker idle timeout to at least 1.5 times the device ping interval.
- If
maximum-keep-aliveis not set, HiveMQ defaults to 65,535 seconds (~18 hours). The actual keep-alive value is negotiated by the device during the MQTT CONNECT process.
-
Adjust device-side MQTT settings for Zebra printers as required.
mqtt.conn[1|2].ping_intervaldefines the ping interval sent to the broker.mqtt.conn1.clean_session_flagaffects session persistence, not disconnection behavior.mqtt.conn1.retry_interval_random_maxsets the randomized reconnection delay.Production Environment 60–120 seconds Test Environment 10–20 seconds
- Optional:
Example Zebra Link-OS commands:
These values ensure the printer remains connected during idle periods and avoids disruptions due to power-saving features.
! U1 setvar "power.sleep.enable" "off" ! U1 setvar "power.wake.radio" "on" ! U1 setvar "wlan.keep_alive.enable" "on" ! U1 setvar "wlan.power_save" "off" ! U1 setvar "mqtt.conn1.qos" "1" ! U1 setvar "mqtt.conn1.retry_interval_random_max" "60" ! U1 setvar "mqtt.conn1.clean_session_flag" "on" ! U1 setvar "mqtt.conn1.ping_interval" "30" -
Configure retained status messages on Zebra printers to track online/offline
state.
When using the following settings, the device will send a disconnect event when entering sleep mode and will automatically reconnect and republish the retained status message when it wakes.
power.sleep.enable=onpower.wake.radio=on
Note: Zebra mobile printer models (ZQ300, ZQ600) running Link-OS 6.7 may require validation to ensure correct MQTT and retained message behavior. -
Verify all the file paths, passwords, and set
client-authentication-modeto NONE. Save the configuration file. -
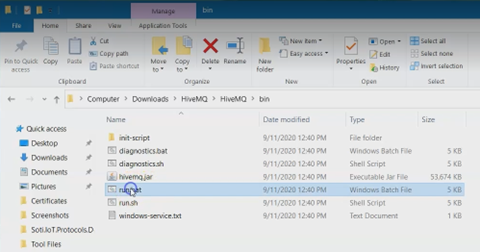
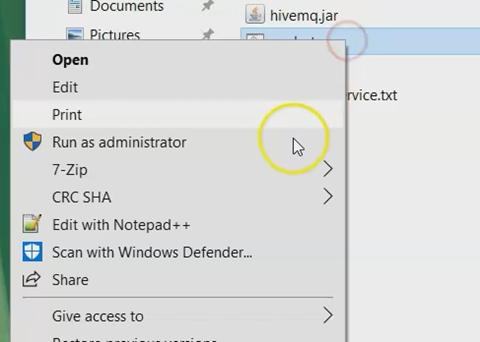
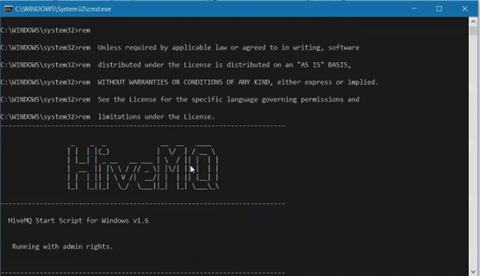
Navigate to the HiveMQ /bin sub-directory.
-
Right-click run.bat and select Run as administrator
to start the HiveMQ server.
Results
Troubleshooting: If you observe partial connectivity (for
example 40% of devices are connected):
- Compare logs and settings between connected and disconnected devices.
- Check HiveMQ logs for idle disconnect messages.
- Verify firmware versions for Zebra ZQ, ZD, and ZT models. Consult Zebra’s release notes for MQTT-specific fixes.
- Confirm HiveMQ persistence mode (in-memory or file-based) is appropriate for your deployment.