Enrolling Printers in SOTI MobiControl
Before you begin
About this task
Use this procedure to perform the following actions:
Procedure
Install Zebra Setup Utilities on your wireless printers.
Note: Perform the steps in this procedure on a computer that can connect to and
configure the printers that connect to a Printer Administration Server
(PAS).
-
Download the Zebra Setup Utilities from the Zebra website.
Currently located at but subject to change without notice.
- Run the Zebra Setup Utilities wizard as an administrator. Follow the basic installation steps before launching the System Prepare Wizard.
-
In the System Prepare wizard, connect the printer to the
computer using the USB.
Install the drivers manually if they are not dectected automatically.The printer is displayed in the Zebra Setup Utilities after a successful installation.
-
Select Finish after you have successfully installed the
printer.
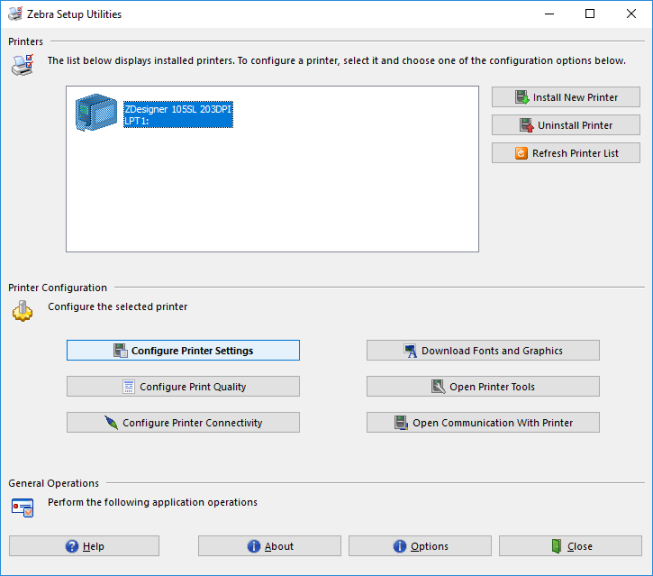
The Zebra Setup Utilities launches with the newly installed printer displayed in the Printers list.
-
In Zebra Setup Utilities, select Configure
Printer Connectivity to open the Connectivity Setup
Wizard wizard. Select the Wireless
Connectivity option and complete the wizard steps.
The printer restarts to confirm that it has received the configuration. Restart the printer if it does not restart automatically. The printer must connect to the computer within three minutes.
- Select Open Communication with Printer to open the Direct Communication dialog box.
-
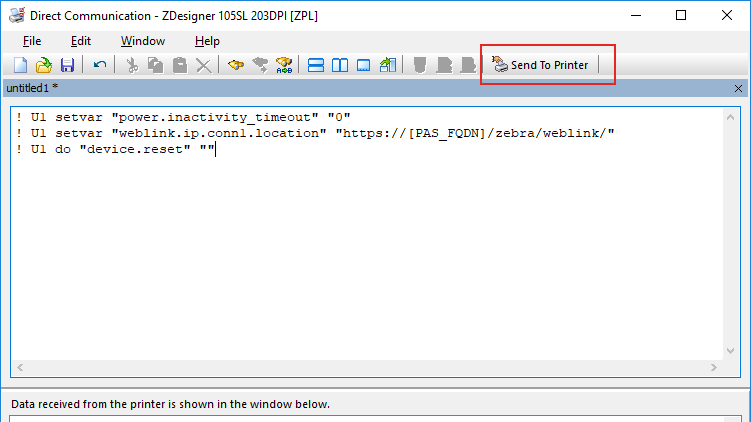
Enter the following commands:
! U1 setvar "power.inactivity_timeout" "0"and! U1 setvar "weblink.ip.conn1.location" "https://PAS_FQDN/zebra/weblink/"and! U1 do "device.reset" "".Where- PAS_FQDN is the fully qualified domain name of the server on which the PAS is installed.
- The
/at the end ofweblink/is required.
 Important: If the PAS is on the same server as SOTI MobiControl, and therefore you do not use the default port, add the port number you chose instead to PAS_FQDN. For example,
"https://PAS_FQDN:8443/zebra/weblink/" -
Select the Send to Printer button to finish connecting
the Zebra wireless computer to the PAS. You may need to select Send
to Printer several times.
The printer restarts after it receives the configuration.
-
After the printer finishes the restart, open a web browser and go to
https://PAS_FQDN/zebra/ or, if
the PAS is on the same server as SOTI MobiControl
https://PAS_FQDN:8443/zebra/.
The printer is displayed in the web page if it successfully connects.
- If you want to connect more printers, go to Zebra Setup Utilities. Connect a new printer using USB and select Refresh Printer List. Or, select Install New Printer to manually install a new computer. Repeat from step 5.
To define enrollment settings for your printers, do the following
steps:
-
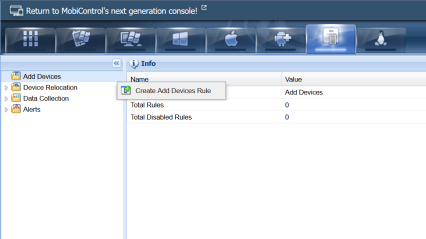
In the SOTI MobiControl legacy console, open the main menu
and go to .
The legacy console window opens.
-
Select the Printer device type. Right-click Add Devices.
Select Create Add Devices Rule to launch the
Create Add Devices Rule wizard.
An add devices rule defines enrollment settings for your devices. You can create multiple add devices rules, each with different enrollment settings. However, you cannot use one add devices rule across multiple platforms.
- Enter a name for the add devices rule. The name must be brief, but descriptive, if you plan to create multiple add devices rules. Select Next.
- Select a device group. All devices targeted by the add devices rule get placed into this device group upon enrollment.
- Optional:
Enter a unique identifier for any printers that you want to blacklist or whitelist (or both).
Blacklisted printers cannot enroll using this add devices rule. Whitelisted printers supersede the rest of the enrollment criteria and can enroll using this add devices rule. If a printer is both, blacklisted and whitelisted, the blacklist takes precedence over the whitelist.
-
Select Filter by printer model or Filter by PAS.
Filter by printer model When enabled, printers that match the selected printer models can enroll using this add devices rule. If you also enable Filter by PAS , you can limit enrollment to only those printers that match the selected printer models and that are connected to the selected PAS. Filter by PAS When enabled, all printers connected to the selected PAS enroll using this add devices rule. However, if Filter by printer model is also enabled, only those printers whose models match the selected printers models and that connect to the selected PAS can enroll. -
Specify a naming convention for your devices. Use a combination of text and
macros to automatically and intelligently name your devices.
For example, Ottawa Sales %AUTONUM% %ENROLLEDUSER_EMAIL% transforms into Ottawa Sales 001 sarah@organization.com, Ottawa Sales 002 saurabh@organization.com.
- Review your enrollment settings. Select Back to return to a previous screen and make changes or select Advanced to adjust the rule further.
- After you review your enrollment settings, select Finish to save your new add devices rule.
To enroll your printers into SOTI MobiControl, do the
following steps:
- In the SOTI MobiControl console, open the main menu and select .
- Select the more menu next to the PAS and select Force Device Scan to add the newly targeted printers to the console.
Results
Your Zebra wireless printers are enrolled in SOTI MobiControl.