Adding Android+ Devices |
To enroll Android+ devices you need to create an 'Add Devices Rule' and then download the installation files to the mobile device. Alternatively, you may Publish your Add Devices Rule to the Enrollment Service and provide the Enrollment ID to the mobile user.
Add devices rules allow MobiControl to name devices, place devices in the appropriate device group, and to generate a customized Enrollment ID that, when enrolled by the user, allows MobiControl to manage the devices.
To create an Add Devices rule, select the Android+ Tab within MobiControl Web Console, then select the Rules Tab. Right-Click the Add Devices Rules folder and select Create Add Devices Rules.

Android+ Tab
The steps below describe how the Create Add Devices Rule Wizard can be used to create an add devices rule:
- Start the wizard
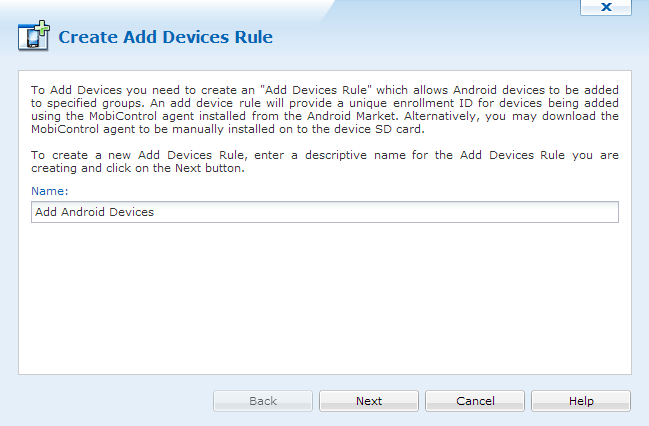
Select the Rules tab from the Android+ tab, then right-click the Add Devices Rules folder and select Create Add Devices Rules. The first page of the Create Add Devices Rule Wizard will be displayed.
Enter a descriptive name for the add devices rule you are creating and click Next.
- Choose an Enrollment Option
Decide how your devices are placed into device groups.
Option Name Description Manual Choose a specific Device Group in which to place the devices enrolled using this rule. Based on LDAP Group Membership Map LDAP Groups to Device Groups. Devices used by members of specified LDAP group will be placed in a corresponding device group.
You can also use an Identity Provider that is backed by LDAP to enroll your devices.
On the next screen you will specify your chosen LDAP groups and a corresponding device group. Multiple LDAP groups may be added.
- Configure the Enrollment Option
Option Name Description If you chose Manual as your Enrollment Option Expand the device group tree and select a device group. Devices enrolled with this add devices rule will be placed into the selected device group upon enrollment. If you chose Based on LDAP Group Membership as your Enrollment Option Use the radio buttons to select either an LDAP or IdP connection to enroll your devices. You can add new LDAP and IdP connections to MobiControl by clicking the dropdown list and selecting Manage Directory Services/Manage IdP Connections. Once you have chosen a connection, enter a directory or IdP entity and map it to a device group. You can add multiple entities and map them to different (or the same) device groups. - Configure Authentication Options
Choose an user authentication method for enrolling devices.
Select Utilize directory services to authenticate users during device enrollment to use an LDAP directory service or an Identity Provider (with LDAP groups) for user authentication. Use the radio buttons to choose a connection type and then select a connection from the dropdown. If you have not already configured a connection, click Manage Directory Services or Manage IdP Connections in the dropdown. See LDAP Connections Manager or IdP Connections for more information.
Select Password required to verify device enrollment to set a single password for enrollment across all devices that enroll using this Add Devices rule.
Select No password required to verify device enrollment to allow devices to enroll without verification.
Note: If you chose Based on LDAP Group Membership as your Enrollment Method, your user authentication is already configured and you will only see the option for your certificate authentication authority.
- Terms and Conditions
The terms and conditions page allows us to send terms and conditions to devices. Users must accept these terms before they are able to enroll their device to MobiControl. If they do not accept the terms and conditions, the device will not connect. If Terms and Conditions is required, click "Enable Terms and Conditions".
To add new Terms and Conditions to the Add Devices rule, click
 . Once clicked, we can see the Terms and Condition Manager. Please see the Terms and Conditions page for more information.
 - Android Management
For access to the Managed Google Play Store, choose which method to use to manage the Android devices enrolling using this add devices rule.
Option Name Description Managed Google Accounts Manage the devices using Google Accounts created in the Google Admin Console. Managed Google Play Accounts Manage the devices using a managed Google Play account. Select the enterprise you want to use from the list.
Skip Google Account Addition During Enrollment on Managed Android Devices Bypass unnecessary device setup steps on Android Enterprise devices. - Agent Download Location
The user can set the device agent download location. The agent can be downloaded from the Google Play store or directly from the server. The user can also select the list of manufacturers to be displayed within the enrollment instructions.
- Create custom device name
The user can set a custom device name using one or more available macros. The custom device name will appear on Device Configuration tab (on device).
- Review summarized
information.
The Rule Summary Information page summarizes the settings configured on the previous pages of the wizard.
If you are satisfied with the configured settings, click on the Finish button to create the device rule, otherwise use the Back button to go to previous screens and make adjustments.
Selecting the "Publish To Enrollment Service" option allows all of your Add devices rule options to be saved in the cloud and accessed by devices via an Enrollment ID. The Enrollment ID contains the information used for the Device Agent to get back to your company's Deployment Server. The Enrollment ID is entered in the Device Agent. The Device Agent is available from the Google Play store by searching for MobiControl
- Advanced Settings
The Advanced button provides you with additional settings for your enrollment. You can:
Set a rule activation and deactivation schedule
Use Rule Filters to specify which devices are configured by this rule. By default, MobiControl will use this rule to configure only those devices that are running a Device Agent created specifically for this device rule. By using advanced settings filters, you can broaden or restrict which devices get configured by this rule when they connect to MobiControl.
Delay the activation of the rule by unchecking Enable Rule.
Preserve the device's location in a Device Group upon a re-enrollment.
Generate a code for the Android+ device agent using the Publish to Enrollment Service. When an Android Device Agent is installed from the Google Play Store there is no way for the device agent to know which Deployment Server it needs to connect to. Using the Enrollment ID created when you "Push to Enrollment Service" allows the generic agent from the Google Play Store to find the correct Deployment Server information.
Provide an alternative user authentication method for devices that use IdP by allowing user authentication to Fallback to LDAP if browser is unavailable.
Bypass extraneous device setup steps on Android for Work devices with Skip Google Account Addition During Enrollment on Android for Work-enabled devices.
Once you have made your changes, click Finish to save the Add Devices rule and close the wizard.
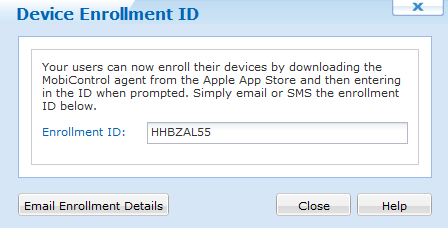
- Enrollment ID
- Download the MobiControl Android files
You can download and place the Android+ Installation Files onto the Root of the SD Card and install the APK from there. You are able to download the Generic MobiControl agent or the Android+ Agent by selecting the APK file from the drop down shown below.
If the INI file and the APK file are both downloaded and placed on the SD card, no enrolment ID needs to be entered after installing the MobiControlDevice Agent. For more information about the device agent please see the Android+ Agent Install Methods page
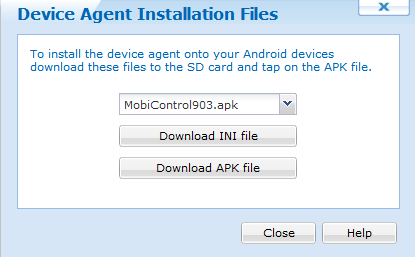
Device Agent Installation Files page
After selecting the Custom device name, click Next to continue the creation of the rule.
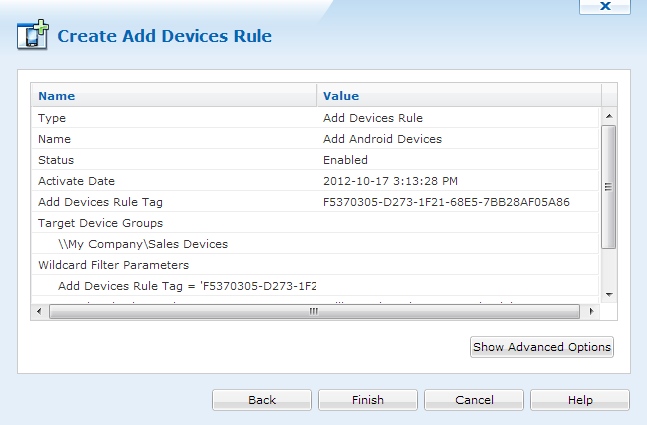
If you download the MobiControl Device Agent from the Google Play store, then you should enter the ID that is shown in the Device Enrollment ID window. This allows the Device Agent to configure what server your device should connect to.
If multiple add devices rules exist for the same device group, the device user will be prompted to select the appropriate Add devices rule.