SOTI Cloud Link Integration
Before you begin
This document describes the integration of SOTI Connect with SOTI Cloud Link and discusses the relevant parts, including the SOTI Cloud Link Broker, the SOTI Cloud Link Agent, and the SOTI Cloud Link Agent Admin Utility Tool.
Setting up SOTI Cloud Link Broker
Procedure
-
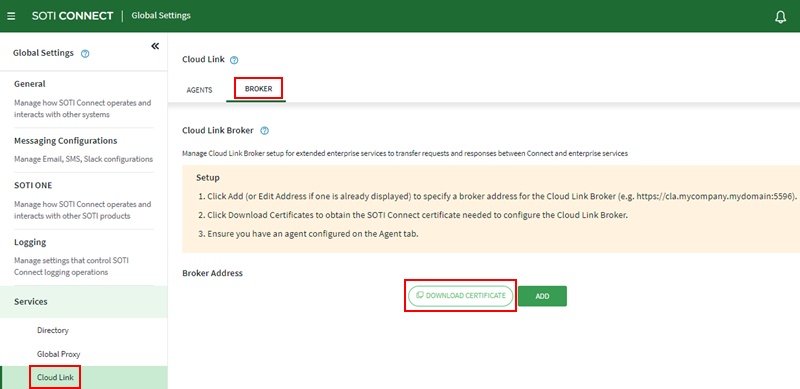
From the SOTI Connect web console, select .
-
Select the Download Certificate button in the Broker
tab of the SOTI Cloud Link page and download the Token
Signature certificate file
(
connect-token-validation-cert.pem). -
Move the Token Signature certificate file to
C:\IOT\certs.Important: For the Azure environment, setGRPC_DNS_RESOLVERtonativein the System Environment.Tip: If SOTI Connect and broker is being installed on an Azure VM, change Idle timeout to30 mins(the default is 4 minutes). -
Open Manage Computer Certificates and navigate to store. Ensure there is at least one certificate issued to the
Fully Qualified Domain Name (FQDN) of the VM or issued to the wildcard
domain otherwise Broker can select the wrong certificate.
- This certificate is used as the SSL certificate of SOTI Cloud Link Broker and must be trusted on the SOTI Cloud Link Agent and SOTI Connect VMs (if they are not on the same VM).
- Certificates issued by GoDaddy are already trusted on other VMs.
-
Download the
Soti.CloudLink.Brokerinstaller file (in*.nupkgformat) from:https://www.soti.net/soticloudlinkagent/help/v2024.0/en/broker/enable_installer.html. -
Extract the
*.nupkgfile to a folder, rename the file extension to*.zipand extract. - Open PowerShell as an administrator and navigate to the extracted folder.
-
Run the command:
Import-Module
                            '.\Soti.CloudLink.Broker.Installer.psm1'
This script checks for required dependencies. Install any dependencies that are missing on your VM.
Note: If a'File is not digitally signed'error occurs, run the following command and try again:Set-ExecutionPolicy -ExecutionPolicy bypass -Scope process. -
Run
Install-IdentityCloudLinkBrokerand follow the prompts.- If this is an initial installation on the VM, enter
noto set up from the start.Note: For subsequent installs, enteryesto reuse the previous configuration. - The Broker Hostname is the FQDN of the VM.
- For the Discovery Service, enter
0. - For the Authority URL, enter
https://+:5596. - For the Audience, leave blank (press Enter).
- For the Token Signature certificate, enter
C:\IOT\certs\connect-token-validation-cert.pem. - For the Token Signature certificate password, enter
123(this is a required password for the installer but is not used elsewhere). - For Kestrel Endpoint Certificate subject, this depends on the certificate you obtained in Step 2.
- If the certificate is issued to the wildcard domain, then use it.
This is likely if the VM is on cloud (for example,
*.soticonnect.cloud). - If the certificate is issued to the VM's FQDN, then enter the FQDN.
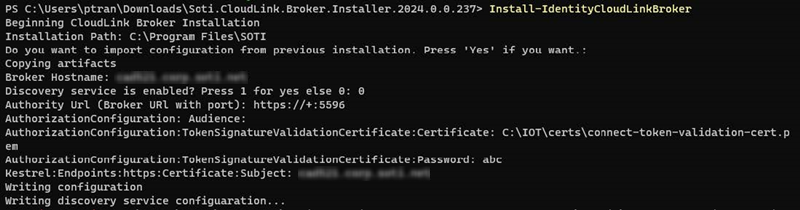
- If this is an initial installation on the VM, enter
-
The installer may display error messages as the installation proceeds. The
installation is successful if
'Cloud Link Broker successfully
                            installed and running.'
is the final message. -
The install script is for SOTI Identity. For the script to
work with SOTI Connect, run this command in
PowerShell:
For Non-Azure environment:
Import-Module
                                ".\Binaries\Soti.CloudLink.Broker.Administration\Soti.CloudLink.Broker.Administration.dll"
                                && Set-CloudLinkConfiguration "C:\Program
                                Files\SOTI\Soti.CloudLink.Broker\appsettings.json"
                                'DiscoveryServiceConfiguration:Enabled' $false &&
                                Set-CloudLinkConfiguration "C:\Program
                                Files\SOTI\Soti.CloudLink.Broker\appsettings.json" &&
                                Restart-Service -Name "SOTI Cloud Link Broker"
For Azure environment:Import-Module ".\Binaries\Soti.CloudLink.Broker.Administration\Soti.CloudLink.Broker.Administration.dll" && Set-CloudLinkConfiguration "C:\Program Files\SOTI\Soti.CloudLink.Broker\appsettings.json" 'DiscoveryServiceConfiguration:Enabled' $false && Set-CloudLinkConfiguration "C:\Program Files\SOTI\Soti.CloudLink.Broker\appsettings.json" 'ProxyConfiguration:ConnectionBlockingDisabled' $true && Restart-Service -Name "SOTI Cloud Link Broker" -
From the SOTI Connect web console, set the SOTI Cloud Link Broker URL using the Add
button on the Broker tab of SOTI Cloud Link page.

Setting up SOTI Cloud Link Agent with SOTI Connect
Procedure
- Download the SOTI Cloud Link Agent installer to the VM from the following URL:
- Run the installer and follow the prompts to set up the SOTI Cloud Link Agent.
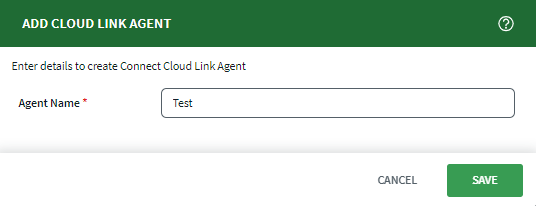
- In the SOTI Connect web console, select .
-
Select the Add
icon to add a new SOTI Cloud Link Agent to SOTI Connect.
-
Copy the SOTI Cloud Link Agent configuration details to the
clipboard by selecting the Copy Configuration
button.
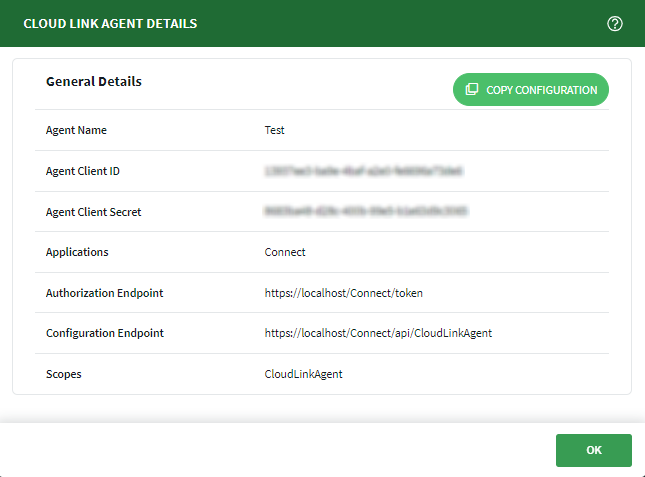
- Open the SOTI Cloud Link Agent Admin Utility Tool.
-
Select Add to paste the SOTI Cloud Link Agent configuration details.
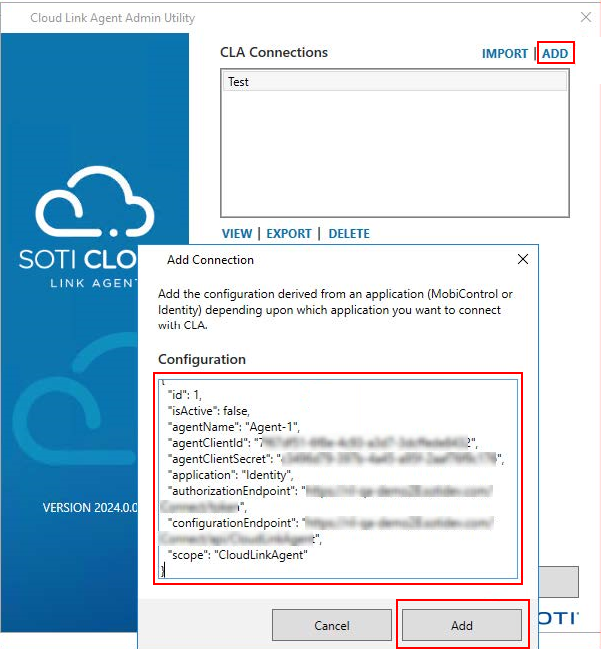 Note: For Azure environment, modify C:\Program Files\SOTI\CloudLink\Soti.CloudLink.GrpcServer.exe.config. Search and modify
KeepAliveTimeInMsto1600000then restart SOTI Cloud Link Agent using the Admin Utility. -
The SOTI Cloud Link Agent appears in the SOTI Connect Agent table.
 Any errors that occur appear in the error logs of the SOTI Cloud Link Agent in
C:\ProgramData\SOTI\CloudLinkAgent.Errors are likely to be SSL certificate issues.Note: You may need to trust the SOTI Connect root certificate in the SOTI Cloud Link Agent VM.Note: You may need to trust the SOTI Cloud Link Broker SSL certificate in the SOTI Cloud Link Agent VM, if the certificate is not issued by GoDaddy.
Updating SOTI Connect or the System Certificate
About this task
Procedure
- When updating SOTI Connect or updating the System Certificate, you must get a new Token Signature certificate (see Step 2. in Setting up SOTI Cloud Link Broker)
-
Move the Token Signature certificate file to
C:\IOT\certs. - Restart the SOTI Cloud Link Broker.
Uninstalling SOTI Cloud Link Broker
Procedure
- Open PowerShell as an administrator and navigate to the SOTI Cloud Link Broker installer folder.
-
Run the command:
Import-Module '.\Soti.CloudLink.Broker.Installer.psm1' -
Run the command:
Remove-IdentityCloudLinkBrokerInstallationand follow the prompts.
Using SOTI Cloud Link Agent in a Certificate Authority Template
About this task
Procedure
- Under Authority type select ADCS.
-
The last option lets you select a SOTI Cloud Link Agent.
 Note: You cannot delete a SOTI Cloud Link Agent associated with a CA template.
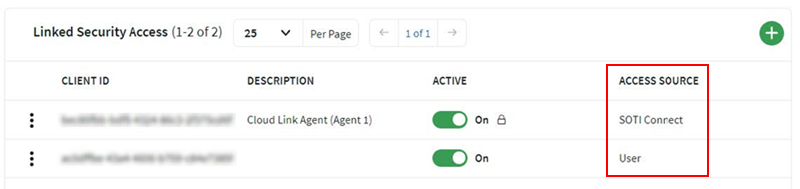
Cloud Link Agents in the Security Access Table
About this task
Procedure
- SOTI Connect indicates the SOTI Cloud Link Agent was automatically added and is controlled by SOTI Connect.
- User indicates the SOTI Cloud Link Agent was added by the user and is controlled by the user.
Troubleshooting
About this task
Procedure
-
Verify that there are error logs on the management server similar to:
Failed to ping CLA: Status(StatusCode="Unauthenticated", Detail="Received http2 header with status: 401" ... - The error logs indicate the SOTI Cloud Link Broker is not using the correct Token Signature certificate. To resolve this issue, download the Token Signature certificate again (see Step 2 in the SOTI Cloud Link Broker Setup section above).