|
|
Device Agent Manager |
The Device Agent Manager is an interface that allows the user to manage the Device Agents that are installed to the devices. A Device Agent is a program that is installed on to the various devices that are to be managed by MobiControl. The software facilitates the server-client communications. The Device Agent Manager allows creation of custom Device Agents that have been specially configured to the settings of your MobiControl installation and the type of devices you have.
You can access the Device Agent Manager from the Rules view (tab) in MobiControl Manager by right-clicking on a specific add devices rule in the left pane, and then selecting Device Agent Manager from the pop-up menu.
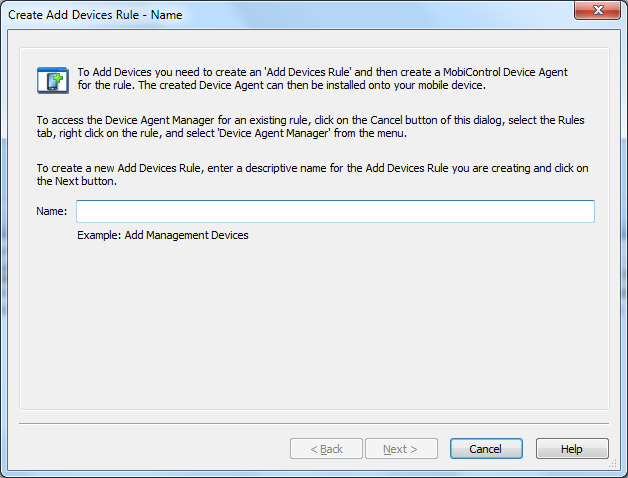
Once you have created an add devices rule, the next step is to create a MobiControl Device Agent. You can create a Device Agent for an add devices rule immediately after creating the rule or at any time after creating the rule using the Device Agent Manager. The created agent is customized for the specific add devices rule that you select.
The following steps outline how to create a Device Agent using the Device Agent Manager.
- Name the Device Agent.
If your Device Agent was created prior to MobiControl version 6 then the Device Agent name will be blank.
This will allow you to add a custom name to the Device Agent, which will help to identify it. Once you have entered a unique name, click Next to move to the next step. This page will only appear in version 5.06 and above.
- Select the device manufacturer.
On the second page of the Device Agent Wizard, select the manufacturer of your device and click the Next button. If the manufacturer of your device is not listed you can try selecting the Other Manufacturers option and click the Next button or you can contact us to make sure that your device is properly supported.
After selecting the manufacturer, click the Next button.
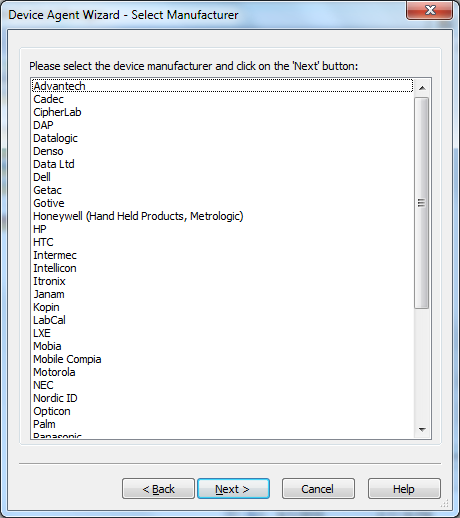
Manufacturer Selection page
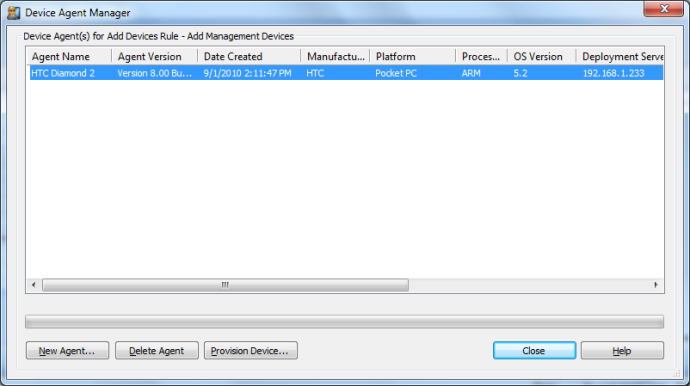
The MobiControl Device Agent Manager allows you to create a Device Agent for a specific add devices rule. The Device Agent Manager also allows you to view and copy files for Device Agents previously created. After creating a device rule, you can access the Device Agent Manager by clicking on the Yes button on the message box displayed immediately after the rule is created, or by going to the Rules view (tab) in MobiControl Manager, and then right-clicking on a specific add devices rule in the left pane, and then selecting Device Agent Manager from the pop-up menu.
The Device Agent Manager displays a list of the Device Agents that have previously been created for the selected device rule, and allows users to create new Device Agents, provision Device Agents onto devices (by directly installing, exporting or generating barcodes) and to delete obsolete Device Agents. For newly-created add devices rules, the list will be empty until an agent is created.
If an agent has been already created, select the Device Agent and click on Provision Device
The following methods can be used to provision the Device Agent on the devices.
You can install the agent onto a device via desktop ActiveSync, by clicking on Install Agent by ActiveSync button if the device is connected to this computer
You can generate a barcode, by clicking on Generate Barcode to provision the Device Agent on a device by scanning a barcode
You can export the Device Agent files to a destination folder by clicking on the Export Agent button. This allows you to deliver the installation files to the target devices via a web site, email, SD cards, etc.
To delete an agent, select the agent from the list and click the Delete Agent button.
To create a new agent, click the New Agent button, the Device Agent Wizard will be displayed.
- Select a method.
This page allows you to select a method that is appropriate for your device. For details about a specific method, select the method by clicking on it. The Help text box at the bottom of the page will display information about the method.
Select the method that is suitable for your device and then click the Next button.

Method Selection page - Configure the device type.
The Device Type dialog box allows you to configure platform, processor and operating system information about your devices. If you dock one of your devices via ActiveSync, and click on the Detect Settings button, the wizard can automatically detect most of the device settings. If your device is not docked you can enter the settings manually.
Click Clone Settings to embed cloned settings into the agent you are creating or optionally create a package which can be deployed to a set of devices via the deployment rule engine. Please see the Clone Settings Package Wizard page and the Device Agent Clone Settings page for more information.
Click the Next button when you have completed the settings in this dialog box.
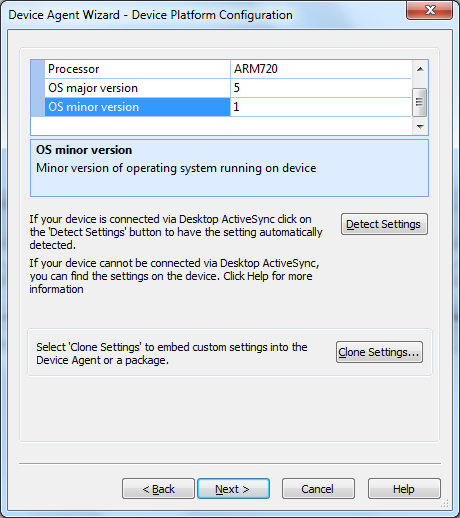
Device Type Configuration page
 Note:
Note: The OS version refers to the version of Windows CE or Windows Mobile. For example, if the version of the OS is 4.20, set the OS Major Version field to 4, and set the OS Minor Version field to 2. You can get information about the OS and the processor from the device. Typically, this information is available at the following locations for these mobile devices, however this may vary for some devices. If the device says Windows Mobile, and is a touch screen enabled device, select Pocket PC even though it says CE below on the CE OS Build. If the device is not a touch screen, select Smartphone.
Device type OS or Processor Information Pocket PC Select Start, then click Settings, click System, and click About to view the information. Smartphone Select Start, then click Settings, and click About to view the information. Windows CE Select Start, then click Settings, click Control panel, and click System to view the information.  Tip:
Tip: Intermec and SmartSystems Settings: We have added the functionality to clone SmartSystems Settings in Intermec devices. Please see the Intermec SmartSystems Settings page for more information about this feature.
- Configure software settings.
The Software Settings page allows you to configure various parameters built into the agent.
Click the Next button when you have completed the settings in this dialog box.
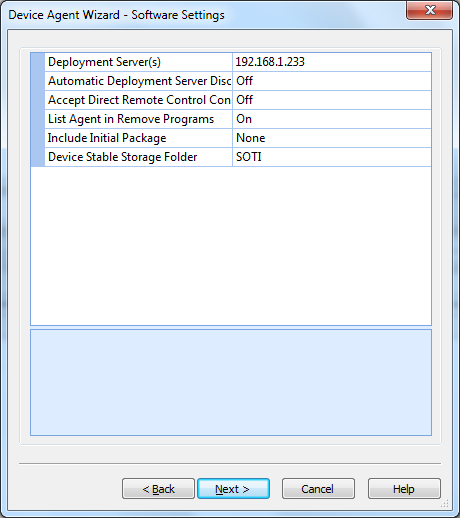
Device Agent Wizard - Software Settings page
Field Name Description Deployment Server(s) Note:Configuration of the Deployment Server address should be performed before agents are created, as the address information will be embedded into the agent installer.
Devices that have the MobiControl Device Agent software installed onto them connect to MobiControl Deployment Servers to receive configuration information as well as to get provisioned with software and data. It is crucial that the device is able to reach the IP address of the Deployment Server via the IP network to which the device is connected.
If your device will be on a public network such as the Internet, you will need to setup an externally routable address for your Deployment Server. Please see the Set Deployment Server Properties page for instructions on setting up an external IP address for the Deployment Server.
Automatic Deployment Server Discovery When this option is enabled, MobiControl Device Agent(s) will attempt to discover Deployment Server(s) using UDP broadcasts when they cannot connect to configured servers. If you have multiple MobiControl installations on the same network, you need to set a unique site name for each installation so that the discovery process will not detect servers in a different installation. Accept Direct Remote Control Connections When this option is enabled, the Device Agent will accept direct remote control connections (TCP/IP remote control connection profile). A direct connection improves performance by reducing latency, however it requires the device to accept the connection without authentication unless SSL Security is enabled. (Please see the Communication and Connection Security page for more information about this.) Remote control is permitted via the TCP/IP(Server) remote control connection profile regardless of this setting. List Agent in Remove Programs When this option is disabled, no entry will appear for the agent in the Remove Programs settings applet on the device, thus preventing the agent from being uninstalled by the device user. Include Initial Package Allows you to specify a package that will be embedded into the Device Agent installer and automatically execute when the agent is installed on the device. Device Stable Storage Folder A stable storage folder is a special folder in the devices file system that is not erased when a device is hard reset. MobiControl uses the stable storage folder on the device to store data and packages so that MobiControl and packages and settings deployed via MobiControl can persist through hard reset.
Note:Stable storage folders do not exist on all devices. For devices that do not feature a stable storage folder, MobiControl will default to a standard folder in the file system. Optionally, you may use an external SD card as the stable storage folder. This option is not recommended in most scenarios, as removal of the SD card will severely impact the operation of the MobiControl Agent.
- Configure the device identifier.
The Device Identifier Configuration page allows you to select how devices are named and uniquely identified.
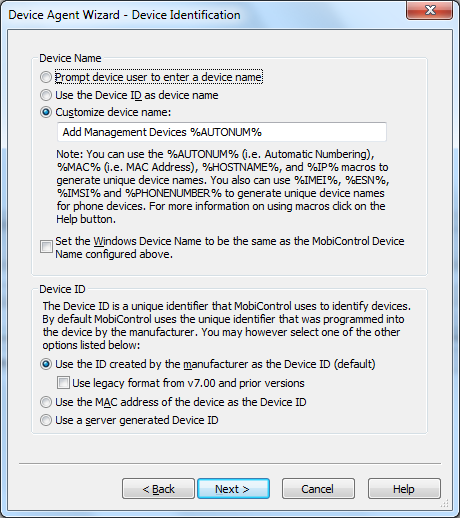
Device Agent Name Configuration page
The following table provides descriptions for the three device naming options:
Field Name Description Prompt Device User When this option is selected, the Device Agent will prompt the user for a device name when it is first started. Use the Device ID When this option is selected, the device ID will be used as the device name. Since the device ID is a cryptic string that is not very readable (e.g. 0003000F-3EAC-0F94-0F00-0300AA3EE877), we generally do not recommend this option.Customize the Device Name This option allows you to enter text as well as use macros to create device names. MobiControl does provide macros. Please see the text following this table.
Set Windows Device Name Checkbox When this option is checked, MobiControl will set the Windows Device Name to be the same as the MobiControl Device Name configured above. Macros
%AUTONUM%allows you to automatically use a numbered sequence as part of the device name. For example, if the value of this field is set toWH%AUTONUM%, then the first device configured will be assigned a name ofWH00001, the second device will have a name ofWH00002, and so on.%MAC%expands to the MAC address of the device. This macro is suitable for use with devices that have a wireless or wired networking capability. The MAC address is a unique number that is built into the network hardware used on the device. In most cases MobiControl can retrieve the MAC address from the hardware. For example, if the value of this field is set toDEV%MAC%, then the device names configured would look similar toDEV00A0F85324D4andDEV00A0F8533422. When the MAC macro is used as the Device ID, the Wi-Fi radio must be enabled when the agent is installed in order for the macro to work.%HOSTNAME%expands to the local host name of the device. We recommend using this macro only in cases where unique hostnames have previously been assigned to devices before the MobiControl Device Agent software is installed.%IP%expands to the IP address of the device. We recommend using this macro only in cases where the mobile devices have wireless or wired networking capabilities and are using fixed IP addresses. The use of this macro is not suitable for situations in which the mobile devices are using dynamic IP addresses (i.e. DHCP) since when the IP address changes the device name will be incorrect.%PHONENUMBER%expands to the phone number of the device. We recommend using this macro only in cases where the mobile device is a Smartphone or Pocket PC Phone Edition. For some devices, the phone number may not be available.%IMEI%expands to the IMEI (International Mobile Equipment Identity) number of the device. We recommend using this macro only in case where the mobile device is a Smartphone or Pocket PC Phone Edition. For some devices the IMEI number may not available.%ESN%expands to the ESN (Electronic Serial Number) number of the device. We recommend using this macro only in case where the mobile device is a Smartphone or Pocket PC Phone Edition. For some devices the ESN number may not available.%IMSI%expands to the IMSI (International Mobile Subscriber Identity) number of the device. We recommend using this macro only in case where the mobile device is a Smartphone or Pocket PC Phone Edition. For some devices the IMSI number may not available.%REG://%expands to the registry in the device. This will allow custom names like serial number (read from registry key) to be used out of the box for device naming, e.g.%REG://HKEY_LOCAL_MACHINE\Software\Apps\SOTI\MobiControl?VN=ESN%%TXT://%will get the content of specified line of the text file (if LN is not specified, it assumes the first line), e.g. %TXT://\Device.log?LN=1%%INI://%will pull a value from a Section in an.inifile and make it the device name, e.g.%INI://\pdb.ini?SC=Device&NM=DeviceName%%EXE://%will get the exit code of the executable and make it the device name, e.g.%EXE://\windows\system32\calc.exe%%STDOUT%will pull the first line of STDOUT output of the Executable and make it the device name, e.g.%STDOUT://cmd.exe /c dir%
The table below provides descriptions for device ID configuration:
Field Name Description Use the ID created by the manufacturer Select this option to use the device ID created by the manufacturer to uniquely identify the device.
This is the default and Windows recommended option.
Use legacy format from v7.00 and prior versions (Checkbox) Check this option if you wish to use MobiControl's legacy format for manufacturer device ID. Use the MAC address of the device Select this option to use the device's MAC address to uniquely identify the device. Use a server-generated Device ID Select this option to allow the Deployment Server to automatically generate a unique ID for the device. - Review agent summary information.
The Agent Summary page summarizes the information about the Device Agent and provides instructions for installing the Device Agent.
Click the Finish button to create the Device Agent files.
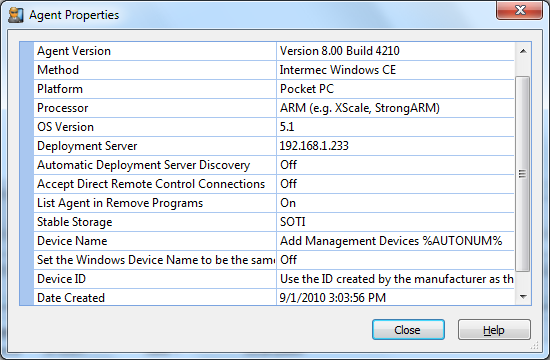
To see the details of an agent, right-click the agent and then select Properties from the pop-up menu.
Agent Properties dialog box
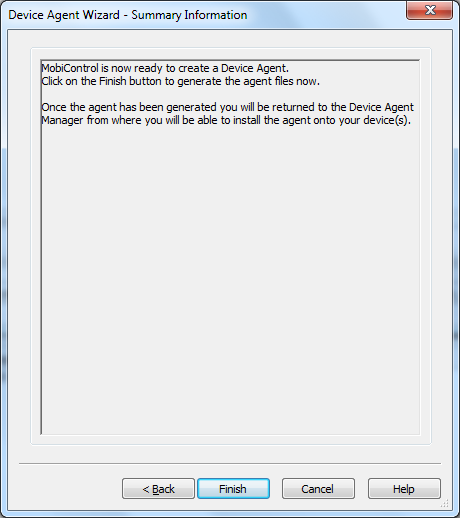
Device Agent Wizard summary information page
- Provisioning agent on a device.
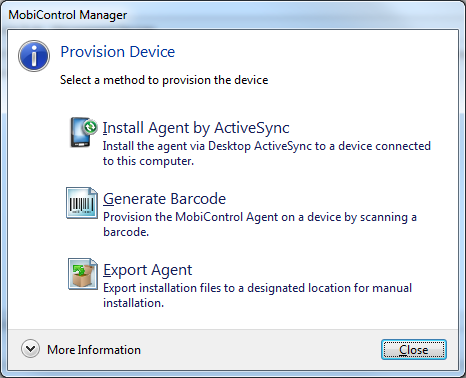
Provision Device Page
After the agent is created, you have several options to install it on the devices.
If your device is connected to the computer running the Manager console via ActiveSync, click the Install Agent by ActiveSync button and the agent will be installed onto the connected mobile device.
If you wish to provision the agent by scanning a Barcode, click on Generate Barcode button.
Please refer to the Generating a Barcode section for further information regarding this.
If you wish to manually deliver the installation file(s) to the devices, select the Export Agent button.
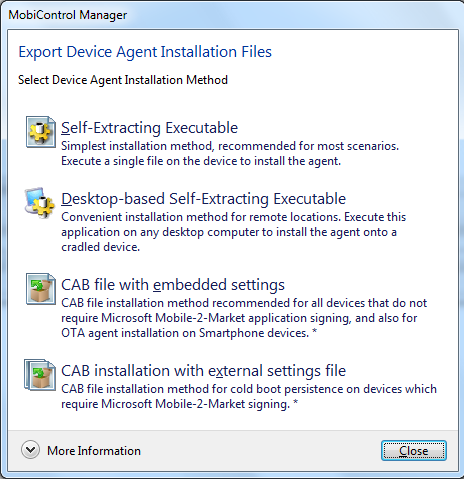
Export Device Agent Installation Files dialog box
You are given four options for export:
Option Description Self-Extracting Executable Note: This method is not supported on Windows Mobile 5 Smartphone or Windows Mobile 6 Standard devices.
This is the simplest installation method and is recommended for most scenarios. A single executable file (
*.exe) will be exported. To install the agent, simply deliver this file to the device and execute it. The self-extracting executable contains the agent's installation.cabfile, as well as any other supporting files that may be required for targeted device platform.Desktop-based Self-Extracting Executable Convenient installation method for remote locations. Execute this application on any desktop computer to install the agent onto a cradle synced device. This will open a light application that will install the agent on to the device via ActiveSync. CAB file with embedded settings .Cabfile installation method recommended for all devices that:- do not require Microsoft Mobile-2-Market application signing. This includes devices that run Windows Pocket PC 2003 and earlier operating systems, Windows CE .NET devices, and rugged hand held devices (e.g. Intermec, Hand Held Products, Psion Teklogix, Symbol).
- run Windows Mobile 5 Smartphone or Windows Mobile 6 Standard operating system (non-touch screen devices).
Starting with Windows Mobile 5, Microsoft introduced the Mobile-2-Market application signing program. The MobiControl Device Agent
.cabfile for Windows Mobile 5 or later operating system devices is signed under this program. However, by embedding the settings selected during the Device Agent Wizard into the.cabfile, the signature is invalidated. If you are installing the agent on a device that does NOT require Microsoft Mobile-2-Market signing, the invalidity of the signature is of no consequence.This method is recommended for Smartphone devices in the scenario where the agent will be made available as a web-download since the Internet browser on a Smartphone does allows
.cabfiles, but not.exefiles to be downloaded. Since all Smartphones require Mobile-2-Market signing, the device user will be prompted to confirm the installation of the "unsigned".cabfile. An exception to this recommendation is for Smartphone devices that have been confirmed with 2-tier security. These devices do not permit the installation of unsigned.cabfiles. In this situation, the first or third export option is recommended.Note:If the device has persistence and it also checks for applications to be Mobile-2-Market digitally signed (like a Pidion device), then you will encounter a problem if you deploy an agent with embedded settings (e.g. initial package or embedded cloned settings). The reason this happens is that the signature of the CAB has been broken, and so it will FAIL to re-install after a cold boot (because the device requires a signed CAB for a silent and automatic re-install).
CAB file with external settings file .Cabfile installation method for devices which require Microsoft Mobile-2-Market signing.
In this method, the signature of the.cabfile remains intact since the settings are specified in a separate file calledMCSetup.ini. Both the.cabfile andMCSetup.inifile must be delivered to the device, along with any other files that may be exported. See the manual installation instructions for details.Manual Installation Examples
Note: Smart phones are capable of downloading only
.cabfiles.Post the
.cabor.exeon a website and direct your users to select the link.Deliver the
.cabor.exefile as an email attachment with instructions for your users to execute the attachment.Deliver the
.cabor.exeon an SD card, and execute the file on the device.Transfer installation files via existing network applications.

Agent Properties dialog box
To see the instructions on how to install an agent manually, right-click the agent, and then select Instructions for Manual Installation from the pop-up menu. Due to the variations between different devices on the market, each set of install instructions is unique. Review the installation instructions provided in the
readme.txtfile exported along with the installation file(s).
![]() Note:
Note:
You can create a Device Agent for computer workstations, laptops, tablet PCs, etc. In order to create agents for these devices, select Microsoft Windows 2000/XP/XP Embedded for the device manufacturer. Please see the Frequently Asked Questions page for more information.