Enrolling Android Classic Devices
Before you begin
About this task
In this procedure, you'll learn how to:
Procedure
-
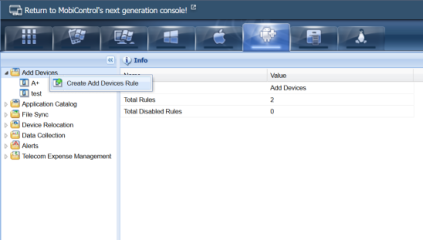
In the SOTI MobiControl legacy console, go to the and right-click Add Devices. Select Create Add Devices Rule to launch the Create Add Devices Rule wizard.
An add devices rule defines enrollment settings for your devices. You can create multiple add devices rules, each with different enrollment settings. However, you cannot use one add devices rule across multiple platforms.
- Enter a name for the add devices rule. Make it brief, but descriptive, especially if you plan to create multiple add devices rules. Click Next.
-
Choose the destination device groups:
Manual All devices enrolled with this rule will be placed in the same device group. On the next screen, select a device group from the list to enroll your devices into and then skip to the step for selecting a user authentication option.
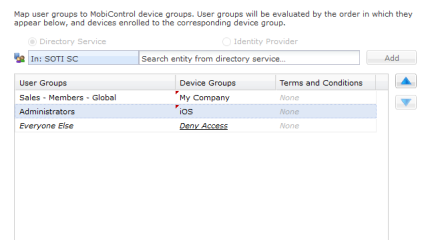
Based on User Group Membership Devices will be placed into groups based on the membership of the user account assigned to the device. You'll be able to associate user groups to specific device groups later on in the wizard. Click Next.
- Choose either LDAP Directory Service or Identity Provider and then select an identity management connection from the dropdown list. If you have not configured any connections yet, click Manage Directory Services / IdP Connections to configure a new connection in the dropdown list instead. See Identity Management for more information. Click Next.
-
Enter a user group (for example, administrators) that exists in your connection in the field and click Add. Once it appears under User Groups, choose a device group from the dropdown list. All members of the user group will be automatically added to the selected device group as soon as they enroll in SOTI MobiControl. If you'd like, add any terms and conditions documents. Click Next.
-
Select a user authentication option.
Note: These options appear only if you chose Manual for mapping your device destinations.
Utilize user groups to authenticate users during device enrollment Use a directory service or an identity provider for user authentication. Select Directory Service to select a directory service connection from the list, and search for a user group using that connection. If no directory service connection has yet been configured, select Manage Directory Services to open the Directory Service Configuration which you can use to configure a new connection.
Select Identity Provider to select an identity provider connection from the list, and search for a user group using that connection. If no identity provider connection has yet been configured, select Manage IdP Connections to open the Identity Provider Configuration which you can use to configure a new connection.
Password required to verify device enrollment Specify a single password for enrollment across all devices that enroll using this add devices rule. No password required to verify device enrollment Allow devices to enroll without verification. - Select a certificate authentication authority. Click Next.
- Optional:
Enable the Terms and Conditions setting and select a terms and conditions document from the dropdown list. If you haven't uploaded a terms and conditions document yet, click Manage to add a new document. Click Next.
Device users will be prompted to accept the terms and conditions upon enrollment.
-
Choose the permissions you want the Android Plus device agent to request.
Note: If you also enable the Deploy latest plugin to enrolled devices option on the Device Setup wizard screen, these permissions are granted silently.
Draw over other applications Grants the permission to display content on top of other apps in the foreground Modify system settings Grants the permission to modify system settings Notification access Grants the permission to read all notifications posted by the system or any installed app Usage access Grants the permission to access app usage history and collect detailed information -
Click Next to skip the Android Enterprise Setup wizard screen.
These options are only applicable for Android Enterprise enrollment.
-
Choose the download source of the Android Plus device agents. Select Download from the Google Play Store to ensure your devices are always updated with the latest device agent. Select Download directly from server if you need to control app updates more strictly. Click Next.
If your preferred Android Plus agents are not already available on the server, you'll need to download them to your SOTI MobiControl instance. Click Manage Agents and add the latest Android Plus device agents.
-
Specify a naming convention for your devices. Use a combination of text and macros to automatically and intelligently name your devices.
For example, Ottawa Sales %AUTONUM% %ENROLLEDUSER_EMAIL% transforms into Ottawa Sales 001 sarah@organization.com, Ottawa Sales 002 saurabh@organization.com, and so on.
-
Decide if you want to install a device plugin on your device at the time of enrollment.
Device plugins grant Android Plus device agents additional management capabilities. See Device Plugins for more information. This setting installs a device plugin on newly enrolled devices if a plugin is available for that device model. If no plugin is available, then the device is skipped. SOTI MobiControl installs the latest available version of the plugin whether its already in your SOTI MobiControl database or not. SOTI MobiControl will update your database with the new plugins it sends to devices as a result of this setting.
You can always install a plugin later if you choose not to install one now.
- Review your enrollment settings. Click Back to return to a previous screen and make changes or click Advanced to adjust the rule further.
- Once you're satisfied with your enrollment settings, click Finish to save your new add devices rule.
-
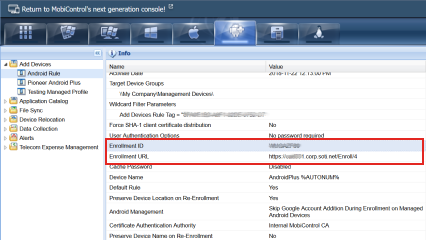
Make a note of the Enrollment ID or Enrollment URL.
-
Use one of the following methods to install the Android Plus device agent on your devices:
- Download the device agent from the Google Play Store.
- Download the device agent from the SOTI MobiControl console or the SOTI MobiControl Device Agents Downloads page and sideload it onto your devices.
- For Samsung devices only: Download the device agent from Samsung Galaxy Apps.
-
Launch the agent on the device and enter the enrollment ID or the enrollment URL of the add devices rule whose settings you want to apply to the device.
You can find the enrollment ID and the enrollment URL in the Information pane of the Rules tab when the add devices rule is selected.
- Follow the instructions in the Device Agent Configuration applet.
Results
Your device is now enrolled in SOTI MobiControl and can communicate with the SOTI MobiControl deployment server.